
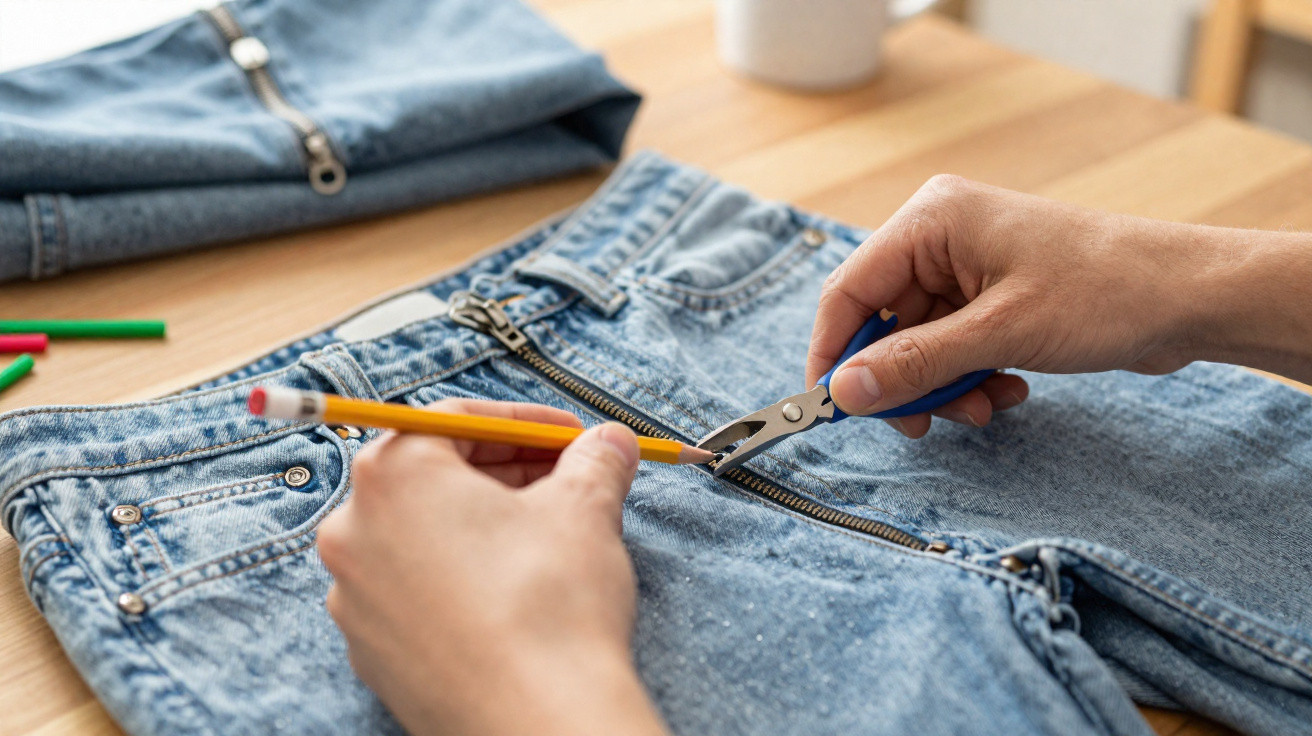
But rather than throwing it away, there is a surprisingly simple fix.
When a zip breaks, many people immediately think of an expensive alteration or getting rid of a favourite item. Our grandmothers knew a straightforward trick that can get most zips working again within minutes, without a needle, thread or specialist parts.
Why zips come open from the bottom
A modern zip may look unremarkable, but its construction is quite precise. At its centre is the slider, sometimes called the puller or runner. It works like a small vice, pressing the two rows of teeth together so that they interlock properly.
Over time, it is this slider that becomes loose. Metal, and even durable plastic, can give very slightly under tension. A difference of less than one millimetre can be enough to stop the teeth gripping correctly. The result will be familiar to many people:
- The zip closes but comes apart immediately behind the slider.
- The slider moves unevenly and wobbles as it is pulled up.
- The zip feels slack, as though it is fluttering.
Tailors report that around 60 per cent of all zip faults are caused by a misshapen slider rather than broken teeth. That is good news, as a slider can often be tightened again with very little effort.
“In many cases, a precise squeeze with ordinary pliers is enough to save a supposedly ‘broken’ zip.”
Grandma’s zip trick: adjust the slider with pliers
The key is to narrow the slider carefully so that it once again presses the rows of teeth together firmly enough. All you need is a pair of flat-nose pliers, some patience and a steady hand.
Step-by-step instructions in just a few minutes
- Open the zip completely: Pull the slider right down. Check that no material is trapped, such as lining, loose threads or a label.
- Hold the slider correctly: Place the flat-nose pliers on the broad side surfaces of the slider, where it is widest in cross-section. Do not grip the pull tab at the top.
- Squeeze gently: Apply only the slightest pressure with the pliers, preferably in several short squeezes rather than one hard press. The aim is to make the slider marginally narrower, not flatten it.
- Test it: Move the slider a few centimetres upwards and then back down. Check whether the teeth now close properly.
- Fine-tune if needed: If the zip still opens, repeat the process. It is better to squeeze gently two or three times than to press too hard once.
The whole process will usually take no more than three minutes. The important thing is not to rush. If you squeeze too firmly, the slider can bind and the zip may jam completely. Should that happen, use the pliers to pull it back very carefully and reduce the distortion slightly.
When a zip sticks: graphite and household remedies
Sometimes the slider works properly again after adjustment but still feels stiff or catches at certain points. In that case, a dry lubricant can help. Graphite, the material found in a pencil core, is particularly effective.
Lubricate with a pencil instead of dripping on oil
Use a soft pencil, ideally grade 2B or softer. Run its tip repeatedly over the zip teeth, preferably while the zip is open. You will see a grey coating on the metal or plastic: this is the graphite layer that will help the slider move more smoothly.
Move the slider up and down several times to distribute the graphite. Finally, wipe away any excess with a cloth, especially on light-coloured clothing or bags.
If you do not have a pencil to hand, other household options can also work:
- a piece of dry soap
- a candle or leftover wax
- a small amount of glycerine
- Vaseline applied sparingly
Each of these leaves a thin layer on the rows of teeth, allowing the slider to glide more easily. Avoid thick oils or greasy sprays from the garage. They attract dust and lint, which can eventually make the zip stick even more.
If the bottom stop is missing: the drinking-straw trick
One particular weak point is the bottom stop: the small component that prevents the slider from slipping off the track at the bottom. If this stop is lost, the slider can come off altogether. Sewing would be the traditional solution, but it is not the only option.
A makeshift replacement can be made from a small section of plastic drinking straw. This works particularly well on jackets, bags and rucksacks with sturdy zip tape.
How to make a new stop
- Cut a section around 3 millimetres long from a plastic drinking straw.
- Split this short piece lengthways so that it can be slipped over the zip tape.
- Place the straw at the very bottom, where the original stop used to sit.
- Secure it with a tiny drop of superglue or strong all-purpose adhesive.
Once the adhesive has dried, the piece of straw acts as a new stop. The slider can no longer escape from the bottom. Visually, the small plastic ring is usually barely noticeable, particularly if its colour and size are a reasonable match.
When household fixes are no longer enough
Not every zip can be saved by adjusting and lubricating it. If the textile tape has torn, several teeth are missing or the slider is badly bent, a home repair has reached its limits.
There are still practical alternatives. Many haberdashery departments stock clip-on sliders. These replacement runners can be clicked onto the row of teeth without unpicking the zip, replacing the old, worn slider. For good-quality jackets or suitcases, this is often worth trying.
If the tape is split or an entire row of teeth has been damaged, replacing the complete zip unit is usually the only solution. This is difficult for non-specialists to sew and is best left to an alterations tailor. Although it involves more work, it can often save money by preventing an expensive garment from being discarded.
Tips for keeping zips working for longer
A few everyday habits can significantly extend a zip’s lifespan. Many faults are caused by the way it is handled day to day.
- When opening jackets, do not simply pull them apart; deliberately pull the slider all the way down.
- When fastening tight-fitting clothing, hold your stomach or the fabric back slightly so there is no tension on the zip.
- Do not overfill rucksacks and suitcases, as excessive tension can distort the slider.
- Remove lint and dirt occasionally with a soft brush.
- For frequently used zips, lubricate them with graphite or soap once or twice a year.
Why repairing a zip is especially worthwhile now
Zip repairs may seem like a minor matter at first. In everyday life, however, they can determine whether a coat, bag or suitcase continues to be used or is replaced with something new. Learning the simple grandmother’s trick involving pliers and a pencil not only saves money but also reduces waste.
Zip problems are especially common with children’s clothing, outdoor jackets and luggage. Once you understand the method, it can be used in many situations, from a winter coat to a sleeping bag. Even where the damage is more serious and an alterations tailor is needed, it helps to know whether a repair is still worthwhile.
Zips may appear insignificant, yet they operate according to clear mechanical principles. Knowing that the problem is usually a worn slider rather than the teeth means reaching for pliers before the bin. This small change in approach can make a surprisingly big difference to both your wardrobe and your wallet.



Comments
No comments yet. Be the first to comment!
Leave a Comment