
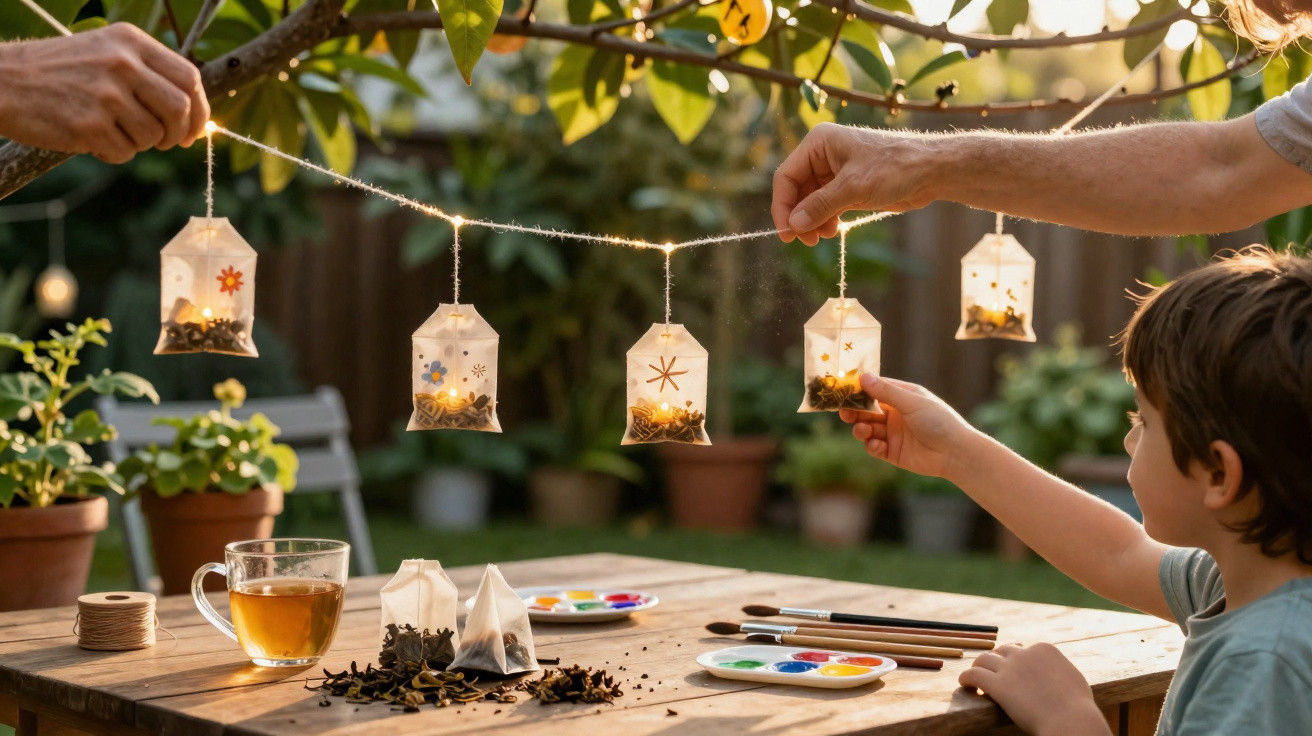
Summer evenings in the garden, a cool breeze and quiet conversation – the only thing missing is warm lighting, as fairy lights and designer lanterns can often be rather expensive. A DIY idea from the UK now shows how ordinary used tea bags can be turned into enchanting mini lanterns that bathe patios and balconies in a soft golden glow.
Why tea bags work so well as lanterns
At first, turning rubbish into decoration may sound rather odd. Yet tea bags have several qualities that make them ideal for the job. Their thin, slightly translucent paper filters the light, creating a warm amber tint. This gentle colouring appears naturally once a bag has been brewed and then dried.
“Every used tea bag is essentially a ready-coloured piece of miniature paper in the perfect format for a small light box.”
DIY creator Sibia Torres Padilla, known online as @Sibster and followed by more than one million people, helped bring the idea to wider attention. Her video showing how she makes small garden lanterns from old tea bags went viral, attracting almost twelve million views. Its appeal lies in the fact that the materials are either already available at home or cost only a few pounds.
Many followers say they now keep a jar beside the kettle, collecting rinsed and dried tea bags for their next craft project. Everyday kitchen waste becomes a free stockpile of craft materials for the garden season.
What you really need for tea bag lanterns
The good news is that a small lantern requires only a handful of tea bags. There is no need for costly specialist supplies, as much of what is needed can usually be found around the home or in a child’s craft box.
- at least eight used paper tea bags (not plastic bags)
- white craft glue, diluted with a little water
- pressed flowers, small leaves or flat paper confetti
- thin wooden sticks, wooden skewers or lolly sticks
- LED tealights or small battery-powered fairy lights
That is essentially all you need. If you wish to hang the finished lanterns, you can also add some wire or string.
Step by step: making a garden lantern from tea bags
1. Prepare and dry the tea bags
A little preparation is needed to turn the bags into sturdy craft paper:
- Gently squeeze out the tea bags after brewing.
- Open one edge of each bag using small scissors or your hands.
- Remove all the tea leaves and dispose of them in food waste.
- Carefully rinse the bag paper with water so that no residue remains.
- Lay the bags flat on kitchen roll or a clean cloth, then leave them to dry completely.
If you plan to make several lanterns, you can collect the bags over a few days. It is important that the paper is fully dry, otherwise mould may develop later.
2. Add the decoration
Now comes the creative stage. Once dry, the tea bags become small, brown-marbled squares that make an ideal canvas.
Mix white craft glue with a little water until it forms a thin, brushable solution. Lightly coat the tea bags with it, then place the following on top:
- pressed flowers or petals,
- small fern leaves,
- confetti made from tracing paper,
- or cut-out silhouettes such as stars, moons or animals.
Cover everything with another thin layer of the glue-and-water mixture. This seals the design in place like a miniature laminated layer. Allow the paper to dry thoroughly again, until it feels slightly firmer and a little stiff.
“The flatter the decorative elements are, the more clearly the design will shine through the paper later.”
3. Make the frame and assemble the lantern
Once the tea bag panels are dry, they only need a frame. Thin wooden sticks or classic lolly sticks work well for this.
Cut the sticks to match the edge length of the bags. Next, glue four sticks around each tea bag to create a small picture-frame-style panel. You will need four of these sides for one lantern.
When all the frames are firm, glue them edge to edge to form a column. Hot glue works well here, although ordinary craft glue can also be used and simply takes longer to dry. The top of the lantern can remain open, while an LED tealight or a small battery-powered fairy light string goes inside at the bottom.
“Important safety rule: Never place real candles or an open flame inside paper lanterns – use LED lighting only.”
Where handmade tea bag lanterns look their best
The finished light columns are lightweight, delicate and give off a particularly soft glow. To keep them in good condition for as long as possible, they should not be left exposed to rain.
They work especially well in the following places:
- on a garden or balcony table as atmospheric table decoration,
- on indoor or outdoor windowsills with a slight roof overhang,
- along the steps of a garden staircase or house entrance,
- hanging beneath a pergola or on a covered balcony.
If you use the lanterns outdoors, it is best to put them outside only for the evening and bring them back in afterwards. This helps them stay attractive for longer, as wind, damp and strong sunlight can damage the paper.
A perfect family activity for rainy days
For many families, tea bag lanterns have become a regular craft activity. Children can arrange pressed flowers or confetti, position shapes, or draw their own small motifs onto the paper. Adults can take care of the glue, frames and lighting.
The idea also brings a welcome additional benefit: a more conscious approach to resources. Children can see very clearly that something thought of as waste can still become beautiful. Every cup of tea provides the raw material for the next light feature on the patio.
Which tea bags are suitable – and which are not
Not every tea bag will work. Some manufacturers use synthetic-fibre bags which may not fall apart, but do not let light through well and are difficult to decorate with glue.
Suitable choices include:
- paper tea bags with no plastic content
- bags with a string and tag, provided the string is cut off before crafting
- larger, flat bags, often used for looser tea blends
Less suitable are pyramid-shaped bags made from fine plastic mesh, or very thick filters that allow very little light through. If you are unsure, simply hold a dried bag in front of a lamp to see how much light passes through it.
Risks, care and durability
As this project uses organic materials, hygiene matters. Damp tea residue, poorly dried bags or flowers can go mouldy. It is therefore better to:
- always rinse tea bags and allow them to dry extremely well,
- use only dry pressed flowers and leaves,
- store lanterns in a well-ventilated room rather than a damp cellar.
If you wish, the surface can be sealed at the end with a thin coat of water-based clear varnish. This makes the lanterns slightly more robust, particularly in humid air. They will not become completely weatherproof, but they will cope better with a short evening on the patio.
More ideas: other uses for tea bag paper
Tea bag paper is useful for more than just lanterns. The same technique can be used to make:
- small window decorations with translucent flower designs,
- gift tags with natural-inspired designs,
- ambient table lights in jars by simply wrapping the paper around a jar containing an LED light,
- decorative collages for cards or notebooks.
In this way, a tea break gradually becomes a small cycle: brew a cup, collect the bags, dry the paper, get creative – then enjoy the garden in the evening beneath the light of your own upcycled lanterns.



Comments
No comments yet. Be the first to comment!
Leave a Comment