
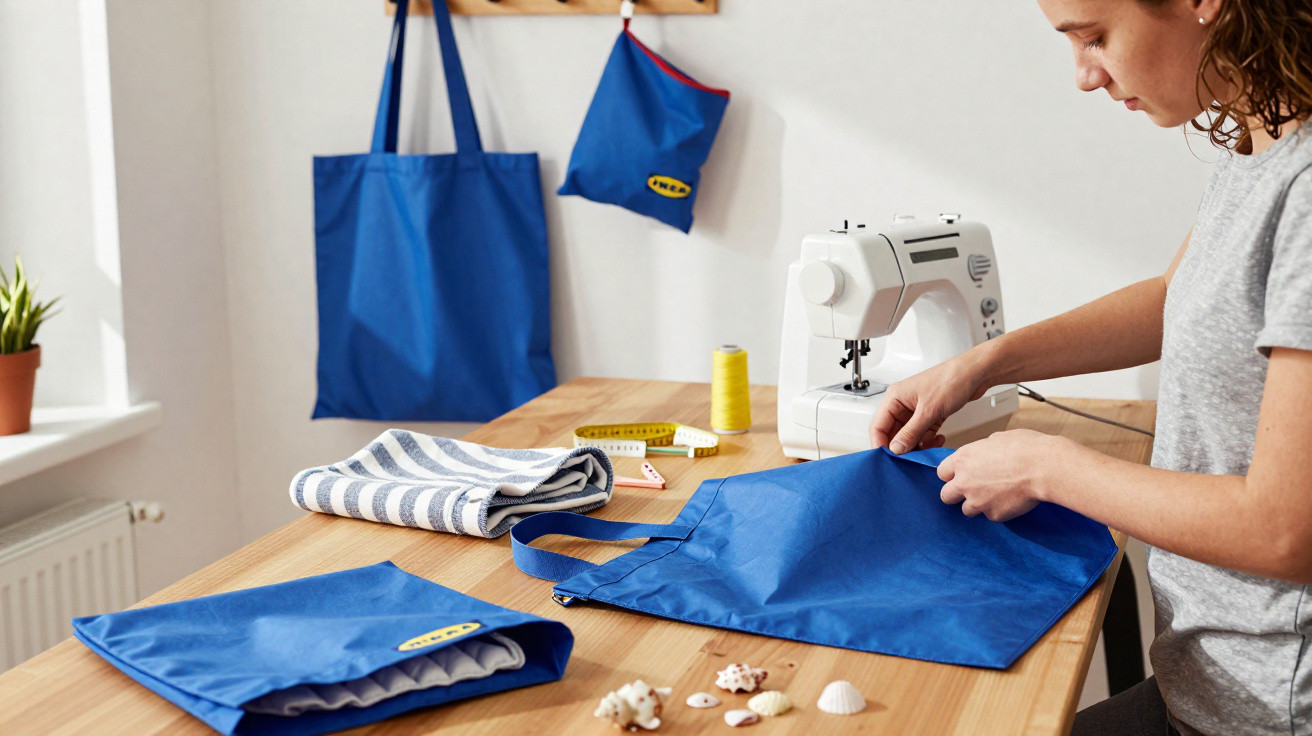
Don’t throw it away: in 2026, the blue classic can be used for far more than carrying shopping.
The distinctive blue bag from the furniture retailer has quietly evolved from a simple carrier into a DIY favourite. Its hard-wearing material is suitable for much more than the weekly shop – and anyone with basic sewing skills can save money while making exceptionally useful everyday accessories.
Why the blue IKEA bag is a hidden high-tech fabric
The familiar carrier bag is made entirely from polypropylene, an exceptionally durable non-woven plastic. It stands up well to water, dirt and abrasion, and can be cleaned with a damp cloth. That makes it ideal for everyday items that may get wet, sandy or grubby.
“According to the manufacturer, the carrier bag holds up to 25 kg – an indication of just how strong the material is.”
Its structure is fairly rigid, holds its shape and does not fray. As a result, cutting it out is much less daunting than working with many fabrics from a haberdashery. Although the seams need to be secure, finished edges are unnecessary in most cases. Anyone usually wary of fraying fabric edges will quickly feel more confident with this material.
Another useful benefit is that the material repels water. Toiletries, swimwear, snack containers and picnic blankets are no problem for it. In many cases, a quick wipe or rinse is all it needs.
Preparation: turning the carrier bag into a sewing project
Before starting the three main projects, it is worth doing a little preparation. The carrier bag should be as clean and flat as possible, so the material can be cut easily.
- Wash the carrier bag with lukewarm water and a little washing-up liquid
- Leave it to dry thoroughly, ideally hung up
- Carefully unpick the seams until it becomes one large flat piece
- Mark the pattern pieces using a felt-tip pen or ballpoint pen
For the sewing machine, a size 90 or 100 denim needle is a sensible choice. A slightly longer straight stitch of around 3 to 4 millimetres prevents the material from being punctured with unnecessary needle holes. Standard polyester sewing thread is sufficient, as it has a little give while remaining strong.
Idea 1: Toiletry bag and wet compartment for the beach
A section of the blue material can quickly become a simple yet very robust toiletry bag. Cut out a rectangle that will form the front and back of the bag.
Insert a zip along the top, then close the sides and base using a straight stitch. If preferred, sew small darts into the corners to create extra volume. The water-repellent surface keeps splashes and leaking bottles well under control.
The bag looks more polished if the cut edges are finished with bias binding. For a bolder effect, use the trimmed-off blue carry handles as edging – this creates an industrial look that works well with a sports bag, rucksack or suitcase.
A useful by-product is a small pouch for wet swimwear:
- Cut a small rectangle
- Sew a zip into one long edge
- Close the remaining edges and bind them with tape
This keeps a wet bikini from ending up directly beside a phone and book in the beach bag, while the rest of the contents stay dry.
Idea 2: XXL beach bag that handles sand and water with ease
Anyone who prefers relaxing by a lake or the sea can turn the carrier bag into a huge beach bag. Start with the bag itself and enlarge it if required. The base can be reinforced with a second piece of the same material, preventing towels, drinks and toys from making it sag.
Strengthen the side seams with visible topstitching. This not only makes the bag sturdier, but also gives it the appearance of an intentional design feature. A large zipped pocket can be added inside for sun cream, keys and a wallet. The water-repellent inner section protects the contents from leaking bottles or damp textiles.
“The result is a lightweight, washable beach bag that can simply be rinsed under the shower after a holiday and left to dry.”
The handles can also be reinforced by stitching across their attachment points several times. Anyone carrying children’s items, snacks, toys and blankets all at once will notice the difference straight away. The small amount of extra work at the sewing machine pays off in everyday use.
Idea 3: Picnic blanket with a tough shell and soft core
The third project uses the material as the underside of a picnic blanket. Sew several pieces together into one large rectangle, creating enough space for two to four people. Place an old duvet cover or a large sheet over this base to form the soft upper side.
For added comfort, insert a thin layer of padding between them – such as an old fleece blanket or leftover material from a quilt project. Sew all layers together around the edge with a straight stitch or wide zigzag stitch. The underside faces the ground, blocking moisture and dirt.
Finish the edge with wide bias binding or strips cut from the carry handles. This does more than add stability: it also protects the edges from abrasion. A sewn-on handle and fastening strap turn the blanket into a portable bundle that rolls up quickly and takes up very little room in the boot.
Using leftovers cleverly: handles, offcuts and small projects
Once a carrier bag has been cut up, several leftover pieces will soon be on the table. Almost none of them need to be discarded. The sturdy handles work well as a key strap, towel hanger or loops in a camper van, where carabiners can be used to attach equipment.
Smaller pieces can be made into covers for an ID card, vaccination record, travel documents or sunglasses. The material also works well as drawer dividers: simply cut strips to size, sew them into small boxes and place them in chests of drawers or a motorhome. The advantage is that the surface can be wiped clean, so crumbs and make-up residue do not cling to it for long.
“With simple cuts and straight seams, offcuts can become a surprisingly large number of useful everyday helpers.”
Technical tips for relaxed sewing with polypropylene
Because the material does not breathe like cotton, heat can build up beneath the presser foot. Avoid long stretches of sewing at full speed. Instead, sew in stages and pause briefly in between. A Teflon foot or a piece of adhesive tape beneath a standard presser foot will stop it sticking to the surface.
The cut edges may occasionally feel slightly scratchy. If this is bothersome, bind every outer edge with cotton tape. This improves how toiletry bags, carrier bags and covers feel in the hand. At the same time, it gives the edges a much neater finish.
Why the carrier bag upcycling trend suits 2026 so well
Every reused piece saves new material, energy and transport miles. Rather than ending up in the bin or an incinerator, the carrier bag gains a second life as a practical item. Durable everyday products such as toiletry bags, beach bags and picnic blankets can be used for years.
The distinctive blue colour also has strong recognition value. Many sewists deliberately choose contrasts, including yellow or neon bias binding, black zips and bold decorative stitching. The resulting products do not look like makeshift solutions, but like statement design ideas.
For people new to sewing, this material offers a good practice surface. Straight shapes, clear seams and minimal fraying make a first larger project less intimidating. More experienced makers can think on a bigger scale: rucksacks, bicycle basket inserts, laptop sleeves or boot storage systems are the logical next step.
The effect becomes particularly interesting when several carrier bags are combined. Those who collect different sizes and logos can create patchwork effects and make larger surfaces. Simple transport bags can therefore become long-lasting, hard-wearing products that remain in use for years – quietly demonstrating on every outing how creativity and conserving resources work well together.

Comments
No comments yet. Be the first to comment!
Leave a Comment