
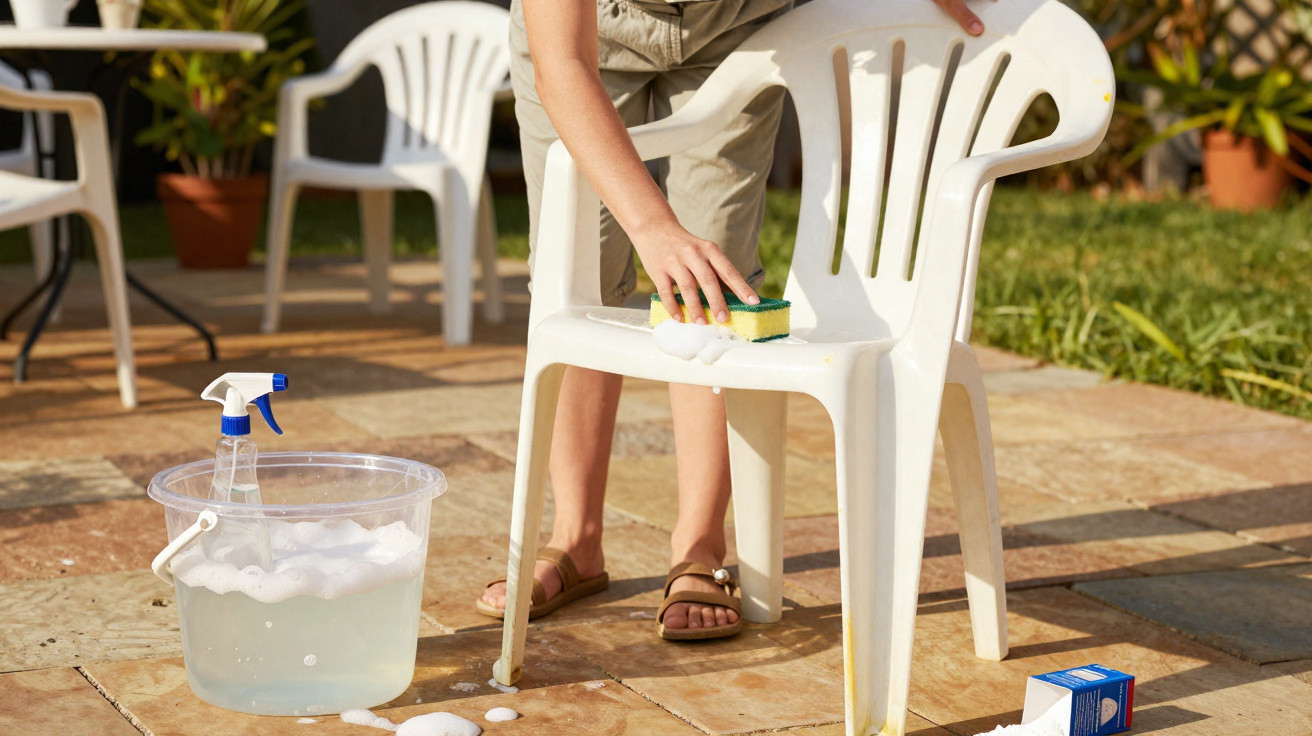
Every spring, it is the same sight: the table looks dull, white chairs appear grey and blotchy, and all the plastic seems tired. Many people immediately consider replacing it. Yet, with a little time, a bucket of water and a clever household remedy, much of this deterioration can be reversed surprisingly well.
Why plastic garden furniture quickly becomes dull and yellow
Plastic is considered easy to maintain and often starts out brilliantly white or attractively coloured – only to turn grey within a few years. There are several reasons for this.
- Sun: UV radiation attacks the surface, making it brittle and porous.
- Rain and moisture: These create a grey film to which dirt adheres.
- Dust and pollen: They settle into the tiny pores and make the surface look grimy.
- Cheap plastic: Material that is not coloured throughout and has no UV protection fades especially quickly.
White chairs made from PVC or comparable materials are particularly prone to taking on a yellowish cast. Coloured versions tend instead to look faded and uneven. The good news is that thorough cleaning can restore a great deal, provided the material is still sound and has no cracks.
Other materials come with their own specific issues: metal can rust without a good coating, wood turns grey and rough and needs oil and sandpaper, while natural rattan does not cope well with constant rain. By comparison, plastic is often the most practical option – as long as it receives occasional care.
The two-step method: clean thoroughly, then refresh
The key is not a miracle product from the DIY shop, but a combination of basic cleaning and a straightforward household mixture. Simply giving the furniture a quick rinse with the garden hose is unlikely to make much difference. First remove the heavier dirt, then deal specifically with discolouration.
Step 1: Basic cleaning with warm soapy water
Before the household remedy can do its job, visible dirt must be removed. Only then can the mixture reach the yellowed surface.
- Remove cobwebs, leaves and dust with a soft brush or hand brush.
- Fill a bucket with warm water and add a little washing-up liquid.
- Wipe down all surfaces thoroughly with a soft cloth or sponge, including underneath the seats.
- Rinse briefly with clean water so that no soapy film remains.
Basic cleaning is crucial: the household remedy can only tackle grey haze and yellowing properly on a reasonably clean surface.
Step 2: Household mixture for grey haze and yellowing
Now for the main trick: mix warm water, clear household vinegar and bicarbonate of soda or baking powder. This combination loosens deposits and visually brightens a yellowed surface.
For a standard spray bottle, use the following mixture:
- 500 millilitres of warm water
- 1 tablespoon of clear household vinegar
- 2 tablespoons of bicarbonate of soda or baking soda
- a small squirt of washing-up liquid
Shake everything thoroughly until most of the powder has dissolved. If the bottle seems too small, simply halve the amounts or divide the mixture between several bottles.
How to use it:
- Spray the mixture generously over the chairs and table.
- Work it in with a soft sponge or microfibre cloth, without rubbing too hard.
- Leave it for a few minutes so the film can loosen.
- Rinse with plenty of water, ideally using a garden hose or watering can.
- Allow the furniture to air-dry rather than covering it with cushions straight away.
After one treatment, many pieces of furniture already look noticeably fresher. The grey haze disappears, the white shows through more clearly and colours look brighter. For stubborn marks, such as flowerpot rings or sunscreen residue, a second application is worthwhile.
When plastic garden furniture needs more than a household remedy
Some stains are so firmly embedded that the household mixture alone is not enough. White surfaces in particular allow for a slightly more assertive approach.
Gentle abrasive care for white furniture
For heavily yellowed white chairs, a cleaning paste made from mineral powder, soap and glycerine can be suitable. It is often sold as a stone-cleaning or scouring paste and works like an especially mild cream cleaner.
- Dip a damp sponge into the paste.
- Rub the affected area using circular movements.
- Leave it on briefly.
- Rinse very thoroughly with plenty of water so that no residue remains.
Important: use the paste sparingly. Scrubbing too vigorously can leave fine scratches, which will collect dirt again later.
Take care with coloured chairs and tables
With coloured furniture, always test the product on an inconspicuous area first. Some cleaners brighten not only the dirt but also the colour itself. If the test area looks good, treat the remaining surface carefully. Stop immediately if a dull patch appears, and continue using water only.
When it is time to say goodbye
No amount of cleaning will help if the material itself is no longer safe. Before embarking on a major cleaning session, carry out a quick safety check.
- Are there obvious cracks in the seat or backrest?
- Does the chair crack when you sit down?
- Are small fragments crumbling away in places?
A chair that could break under an adult’s weight no longer belongs on the patio. Even the best household mixture cannot solve that problem – the risk of a fall is simply too high.
Purely cosmetic signs of ageing are different. Light scratches or patchy colour can sometimes be concealed with a little sandpaper and a specialist plastic spray paint. Start by sanding very lightly, for example with 120-grit paper, remove the dust, then spray according to the manufacturer’s instructions. This creates a more even finish.
How to keep plastic furniture looking good for longer
After such a major rescue job, nobody wants their chairs to look the same again within a year. A few simple habits can help prevent this.
Anyone who protects their plastic furniture will need to resort to intensive spring cleaning far less often.
Protection when buying and storing furniture
- When buying, specifically ask for UV-protected versions.
- During winter, store furniture somewhere dry and protected from direct sunlight where possible.
- If there is no cellar or shed, use sturdy protective covers.
- Do not leave airtight sheets directly over the furniture for long periods, as condensation can build up beneath them.
Regular care rather than a major clean-up
Instead of launching a cleaning marathon every two years, a small routine is often enough:
- During the season, wipe the furniture down every few weeks with warm soapy water.
- Remove compost, bird droppings and greasy splashes from the barbecue promptly.
- Do not use greasy oils or furniture polishes on plastic – they often make the surface softer and more vulnerable.
What really causes “yellowing”
Many people assume that the colour itself is changing. In reality, it is usually caused by a combination of material degradation, layers of dirt and fine micro-cracks. Light, oxygen and moisture attack certain components in the plastic. The surface changes chemically, becoming duller and sometimes slightly yellow or grey.
The household mixture cannot reverse these processes, but it does remove deposits and visually brighten the surface. This is why some furniture can look almost new after treatment, while other pieces remain slightly patchy – depending on how severely sunlight has already broken down the structure.
Practical additions for everyday life in the garden
Anyone reorganising their patio can combine a few useful measures: light-coloured seat cushions protect the seating surface from direct sunlight while adding comfort. Put saucers underneath plant pots so standing moisture does not leave a ring on the table. Positioning a parasol over the dining table protects not only skin, but the material as well.
There is another point that many people underestimate: sunscreen, self-tanner and insect repellent can leave greasy smears on plastic. A quick wipe after an intense sunbathing session prevents these residues from becoming permanently absorbed and difficult to remove later.


Comments
No comments yet. Be the first to comment!
Leave a Comment