
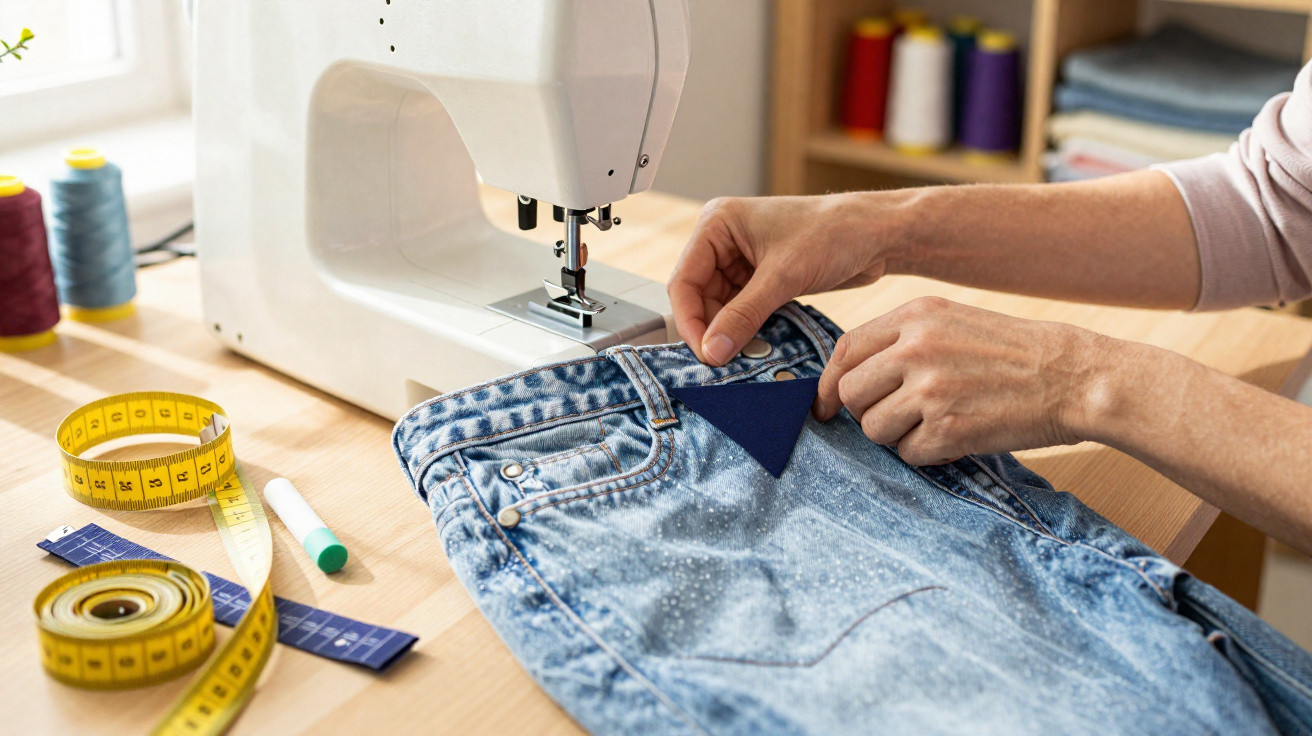
A small, smart alteration can prevent both the sadness of parting with a garment and frustration with your wardrobe – and you can do it today.
Many pairs of trousers become less comfortable over time. A wash can distort the fibres, while your stomach may feel fuller in the evening than it did in the morning. That does not mean they need to be thrown away. A targeted adjustment at the waistband seam restores comfort without changing the silhouette.
Why this sewing trick saves the waistband
The waistband edge on classic jeans or fabric trousers is rigid, made from a closely woven material with very little give. When your stomach feels tight, the button and zip are the first areas to suffer because that is where pressure builds up. Shifting that pressure creates extra room while keeping the shape around the hips and seat intact.
“A small elastic insert at an inconspicuous seam can add up to 5 centimetres to the waistband – while saving resources and money.”
For years, the French environmental agency ADEME has stressed that wearing clothing for longer cuts waste and saves CO₂ in the fashion supply chain. A quick waistband alteration does exactly that: it extends the life of a favourite item rather than requiring you to buy something new.
How to gain up to 5 cm at the waistband
Preparation
- Measure your current waistband circumference and the extra width you want with a tape measure.
- Mark the side seam on both the left and right at waistband level using tailor’s chalk.
- Choose firm, flat elastic at least 3 cm wide, or a thick stretch fabric.
- Gather scissors, a seam ripper, pins, a sewing machine with a zigzag stitch, or a sturdy hand-sewing needle.
Open the seam without ruining the design
Turn the trousers inside out. Unpick around 4 to 5 centimetres of one side seam or the centre-back seam. Then open the waistband precisely along its existing topstitching. Leave belt loops untouched wherever possible. This preserves the appearance at the front and around the hips.
Insert elastic triangles
Cut two small triangles from the elastic or stretch fabric. The short edge should sit along the top of the waistband, with the point facing down into the seam. Pin the triangles into the V-shaped opening you have created. Briefly try the trousers on and check that both sides provide the same amount of extra width. If needed, move the pins by a few millimetres.
Sew the edges using a zigzag stitch so the insert remains stretchy. Then neatly catch the waistband back into the seam. Keep the edges flush to avoid creating a bulky ridge.
“Thirty minutes of work is often enough to create 3 to 5 centimetres of extra room – with no shopping trip and no visible alteration at the front.”
Finishing touches and a quick test
Secure the thread ends firmly, then press the seam flat so that it does not rub. Fasten the button and zip while standing and sitting. Check whether the pressure is now absorbed at the sides. Once the fit feels right, attach a narrow fabric facing over the seam on the inside. This protects your skin and improves durability.
Comparing waistband extension methods
| Method | Typical increase | Visibility | Durability | Suitable for |
|---|---|---|---|---|
| Elastic triangle insert | 3–5 cm | Hidden beneath a top or jumper | High with firm elastic | Jeans, chinos, suit trousers |
| Bias-cut fabric, without elastic | 2–4 cm | Very discreet; can match the fabric | Medium; depends on the fabric | Natural materials, people who prefer not to use elastic |
| Button extender or hair tie | 1–2 cm | Visible without a belt | Low; temporary | An urgent fix before an appointment |
If you do not like elastic: a bias-cut alternative
Want to avoid synthetic materials? Use offcuts from an old trouser leg in a similar colour. Cut the triangles on the bias, meaning the grain runs diagonally and gives the fabric a slight amount of stretch. Insert the pieces as described above. Use a dense zigzag stitch or an overlock stitch to prevent the raw edges from fraying. Expect slightly less added width than with elastic, but the waistband remains entirely fabric-based and breathable.
Tips for fit, appearance and durability
- Keep the front belt loops unchanged so your belt sits as usual.
- Two smaller inserts at the sides are preferable to one large insert at the back, as they spread the tension more gently.
- Select tone-on-tone thread so the stitching blends in visually.
- Use a size 90/14 or 100/16 jeans needle, which reliably pierces thick layers.
- Test the stretch by hand before sewing the insert in. It should give, but must not feel slack.
- Secure the ends of the zigzag seam with backstitching to stop it unpicking when you sit down.
Special cases: favourite jeans, menopause and daily changes
Many people experience a changed waist measurement during the menopause. Two narrow side inserts add flexibility exactly where pressure occurs. The waistband feels noticeably more relaxed when sitting, yet remains invisible under a shirt or jumper.
This sewing trick also helps with day-to-day fluctuations. Anyone who goes jogging in the morning and sits for a long time in the evening will know the pull around the button. An elastic buffer accommodates that change. The zip stays closed and the front pleats remain smooth.
With favourite jeans featuring a distinctive wash, a discreet finish matters most. Open the seam at the centre back or in the shadow of a side seam wherever possible, leaving the characteristic faded areas undisturbed.
Avoid these common mistakes
- Elastic that is too soft creates ripples at the waistband; choose firm, flat elastic instead.
- Cutting too large an opening can pull the pocket bag out of shape; keep it to 4 to 5 centimetres.
- Excessive ironing heat can damage elastane; use low steam and a pressing cloth.
Care, cost and when to see a tailor
Wash altered trousers inside out. A low spin speed is kinder to both seams and inserts, and line drying is best. Only tumble-dry the waistband if both the elastic and fabric are designed for it.
Material costs are minimal: a 20-centimetre piece of elastic, some thread and a fabric offcut. Without a sewing machine, stitch the insert in place using small running stitches and doubled thread. For very thick jeans, it can be worthwhile visiting a tailor. The alteration usually costs less than a new belt and avoids the need to replace the trousers.
Extra benefit: adapting rather than discarding
This method lets you adapt your wardrobe to your life, rather than the other way around. Seasonal weight fluctuations, a bloated stomach after eating or a period of increased home working are no reason to add to the pile of unwanted clothes. You create space at the waistband while retaining your style and silhouette.
Definition: in tailoring, a “soufflet” is a wedge-shaped insert. It expands a specific tight area without altering the entire garment. Similar wedges are used in sportswear, for example under the arms. The same mechanism works at a trouser waistband: greater freedom of movement with the same outer line.


Comments
No comments yet. Be the first to comment!
Leave a Comment