
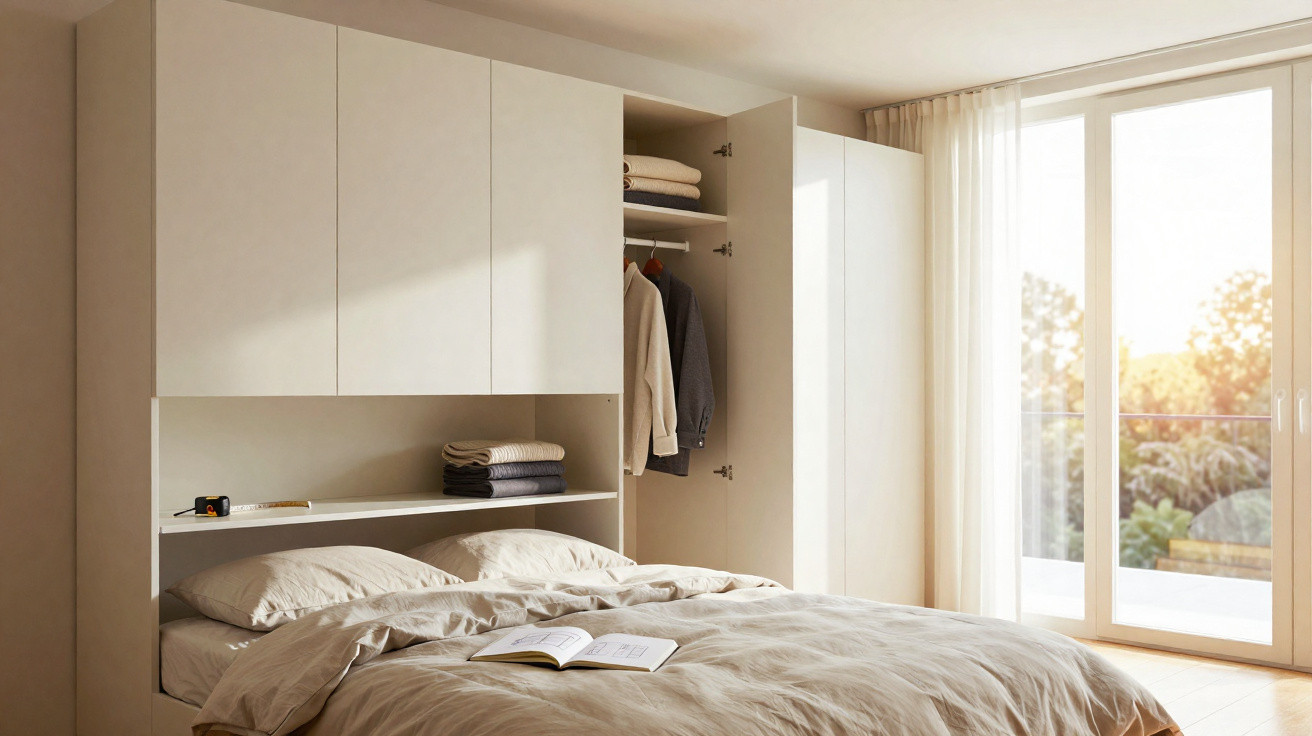
Anyone living in a small flat will know the problem: the bed occupies almost the entire room, wardrobe doors bang into the wall, and there still needs to be space for coats, bedding and suitcases. Rather than a stylish dressing area, there is often only a bulky wardrobe that overwhelms the room. Yet a layout technique used by interior designers for years can create an almost fully fledged dressing area even in the tiniest rooms - without adding any square metres, simply by viewing the space differently.
Why conventional wardrobes spoil small rooms
The usual mistake begins in the furniture shop: you quickly measure the wall, choose a wardrobe that “just about” fits, and put it against the available stretch of wall. Job done? Not quite. In reality, this type of standard wardrobe often projects 60 centimetres into the room, steals light and sits directly in the natural route through the space.
Most people consider only floor area when furnishing a room. Length multiplied by width - and that is it. Ceiling height is almost entirely overlooked. This is exactly where valuable cubic metres are wasted: space that could turn a crammed bedroom into a well-planned dressing room.
“Anyone who thinks only in square metres in a small room loses. You can only gain by planning in cubic metres.”
Once you deliberately look upwards, it quickly becomes apparent that there is often half a metre of empty space between the top of a wardrobe and the ceiling. It may sound insignificant in numerical terms. In practice, though, it is a complete unused band of storage running around the room. In a small room, this dead zone is a sheer waste of valuable space.
The bridge wardrobe above the bed: an overlooked storage marvel
For this reason, interior designers are increasingly using a principle many people know from older bedrooms, but which is now being interpreted in an entirely fresh way: the bridge wardrobe above the bed. This is a furniture bridge that frames the bed and makes maximum use of the headboard area.
How the bridge wardrobe concept works
The principle is straightforward: rather than positioning a wardrobe somewhere else in the room, all storage is concentrated along one section of wall - behind and above the bed.
- Tall wardrobe units or shelving are placed on the left and right of the bed.
- A continuous upper unit joins both sides like a bridge.
- The bed sits within a kind of alcove, giving the room a clear structure.
The benefit is that the remaining walls stay clear or can be furnished very lightly. Routes through the room remain unobstructed, while the eye can travel freely across the space. Many people find this bed alcove a calming, protective corner - especially those who feel less comfortable in open, bare rooms.
“A well-planned bridge wardrobe often replaces several wardrobes at once - and can still look less bulky at its best.”
Every centimetre up to the ceiling matters
For this approach to work, a partial bridge wardrobe is not enough. Storage furniture should extend right to the ceiling. Only then can the room’s potential truly be used. There is also a major psychological advantage: tall, narrow fronts draw the eye upwards and make the room appear higher.
The layout could, for instance, be arranged as follows:
| Area | Use |
|---|---|
| Lowest compartments beside the bed | Everyday clothes, nightwear, books |
| Middle section | Folded T-shirts, jumpers, drawers for smaller items |
| Upper bridge | Seasonal items, duvets, suitcases, rarely used belongings |
| Right at ceiling level | Spare pillows, guest bedding, keepsakes |
A simple step stool or slim folding stool is sufficient for the high compartments, and it can be stored inside the bridge wardrobe itself. This creates extra storage without leaving additional furniture standing around.
Invisible rather than bulky: how storage visually disappears
A full wall-to-wall bridge wardrobe around the bed can soon feel oppressive if its appearance is poorly planned. The expert rule is therefore this: the furniture should blend into the room as far as possible, rather than looking like an alien addition.
Tone-on-tone rather than harsh contrast
The easiest approach is to use almost exactly the same colour for the fronts and the wall. If the walls are painted in warm off-white, pale beige or soft sage green, use that precise shade for the bridge wardrobe doors too.
“When the wardrobe and wall are the same colour, the eye no longer sees a block of furniture, but simply a calm surface.”
Choosing this tone-on-tone solution immediately makes a small sleeping space feel more restful. The furniture recedes into the background, and the room looks tidy even when it is filled with clothes up to the ceiling.
Details that make the difference
Several small choices will prevent the new storage from looking like a wardrobe monster:
- Handleless fronts: Push-to-open systems remove knobs and handles from view. The surface looks smooth, calm and contemporary.
- Incorporate mirrors: Mirrored sections on individual doors - ideally opposite a window - elongate the room and direct light into darker corners.
- Lighting on the furniture rather than the bedside table: Wall lights or reading spots fixed directly to the bridge wardrobe free up bedside cabinets. In an extreme case, bedside tables can be omitted altogether.
If you worry that a mirror above the bed will make the room feel unsettled, place it on the outer side of one of the side wardrobes instead. The bed remains protected while the effect on the room is still considerable.
Plan your mini dressing area step by step
Before placing an order with a furniture retailer or joiner, it is worth carrying out some brief but precise planning.
- Measure the room: Record the room’s length, width and exact height. Take radiators, opening windows and sockets into account as well.
- Decide the bed size: Establish the bed width, such as 140, 160 or 180 cm, along with the headboard height. The bed is the centre of the whole plan.
- Allow the minimum room for walkways: There should be at least 60 centimetres between the edge of the bed and the opposite wall; 70–80 centimetres is better.
- Assess storage needs realistically: How many clothes need hanging space, and how many shelves are needed for folded items? What must be kept in the bedroom, and what could go in the hallway or cellar?
- Deliberately reserve upper compartments for rarely used items: This means the height does not become inconvenient in daily life, while still providing a great deal of storage.
Those with practical DIY skills can even build a straightforward bridge structure themselves, using tall standard carcasses and a row of bridging wall cabinets. For awkward layouts with sloping ceilings, however, it is worth requesting a quote from a joiner who can tailor the solution to the millimetre.
What should definitely be avoided in tiny bedrooms
Visual clutter is the greatest enemy of small rooms. Even a perfectly planned bridge wardrobe will quickly look overloaded if chaos surrounds it.
- Open shelving crammed with décor and clothing
- Bright, heavily patterned bedding combined with coloured wardrobe fronts
- Different types of wood and several bold colours in the same room
- Too many small furniture pieces, such as stools, side tables and chests of drawers
Anyone seeking a dressing-room effect in the bedroom should instead choose a few large surfaces and a restrained colour palette. A calm floor, a colour-matched bridge wardrobe and an understated headboard make the room feel high-quality - almost like a small hotel suite.
Why a bridge wardrobe is worth the effort
A thoughtfully designed unit above the bed does more than make room for clothing. Many people use the side wardrobes for books, technology, lever-arch files or hobby items that would otherwise disappear into boxes. The clear structure makes it easier to keep track of belongings, tidy up more quickly and leaves far fewer “open corners” where laundry can pile up.
Once people start using vertical space consistently, they often rethink other rooms too: ceiling-height shelving in the hallway, tall pantry cupboards in the kitchen and fitted cupboards in the bathroom. Step by step, this creates a far tidier home even when the number of square metres remains limited.
For people living in pressured housing markets who can scarcely afford to move to a larger flat, this change in perspective can bring enormous relief. Rather than dreaming of more floor space, they simply make more of what they already have - gaining noticeably more freedom, breathing room and order in everyday life.






Comments
No comments yet. Be the first to comment!
Leave a Comment