
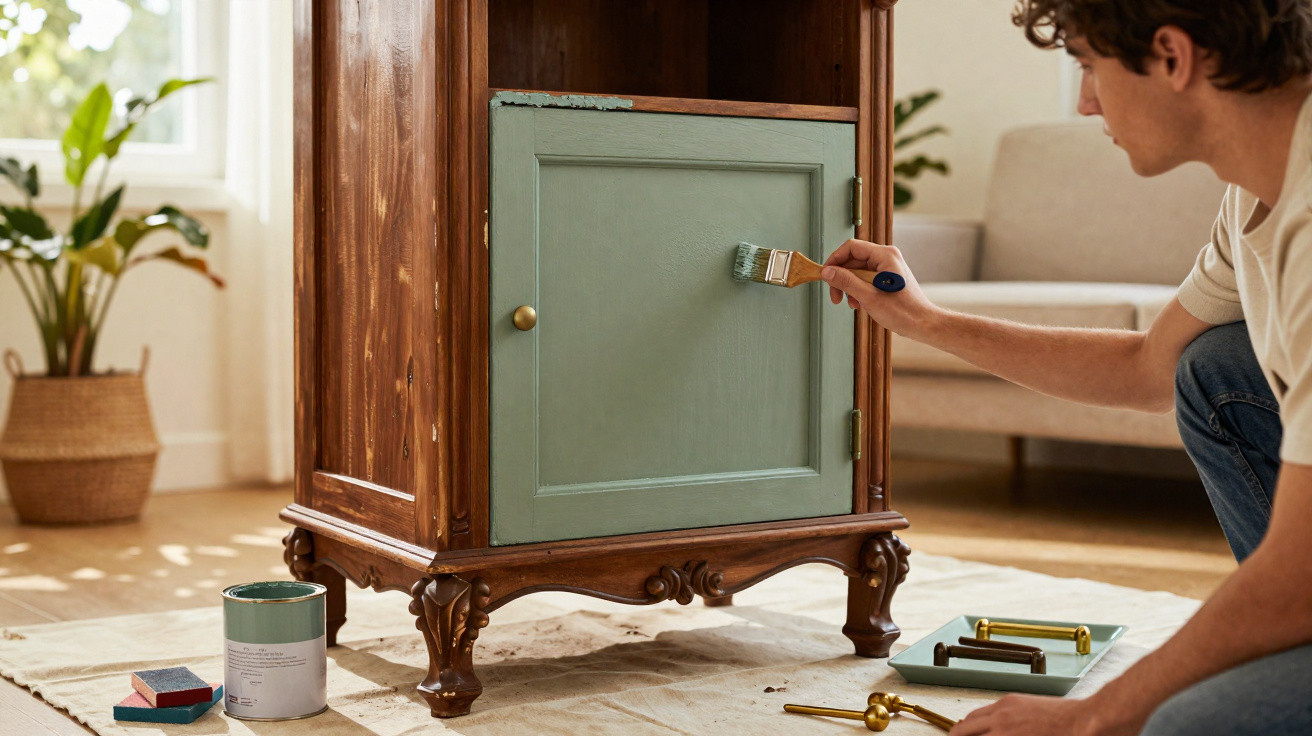
With a few simple techniques, an inherited cabinet can become a surprisingly contemporary statement piece.
Inheriting old furniture often creates a dilemma: it carries history, yet looks bulky, dated and completely at odds with your own interiors. Rather than buying costly new pieces, more and more people are choosing a smart makeover. With a manageable budget, some time and a clear process, a dusty heirloom can be turned into an up-to-date one-off that deserves pride of place in the living room again.
Why an old cabinet is worth more than you might think
At first, all you may notice is a dark finish, yellowed handles and a style that has long gone out of fashion. Look more closely, however, and many such pieces reveal solid wood construction, dependable stability, decades of proven use and emotional significance. Throwing them away would be both wasteful and expensive.
A well-executed makeover often costs just €30 to €100 – a solid-wood sideboard cabinet of comparable quality could easily cost ten times as much when bought new.
There is an environmental benefit too: every cabinet kept in use saves materials, transport miles and packaging waste. Reusing a piece already in the home instead of ordering a new chipboard cabinet is about as sustainable as furnishing gets.
For many owners, the stories matter just as much. It may be the chest of drawers from a childhood bedroom or the sideboard cabinet from a grandparent’s home. Updating a piece like this preserves those memories without making the room feel stuck in the past. In particular, it creates an appealing contrast in bright, Scandinavian-inspired interiors and can make a room feel more lively.
Preparation: a thorough start is essential for a good result
Before any paint is applied, preparation is the only priority. Cutting corners at this stage can lead to peeling paint, stains and marks that remain visible later.
Clean, dismantle and protect
- Clean the surfaces: Use a degreasing cleaner to remove dust, wax residue and old polish, paying particular attention to handles and edges.
- Remove handles and fittings: This leaves a clean surface and makes every corner accessible.
- Cover the surrounding area: Protect the floor, skirting boards and nearby walls with sheeting or paper.
- Secure loose components: Take out drawers, remove doors where appropriate, or at least open them fully.
Many DIY enthusiasts reach for a sander immediately. While this can be useful on heavily varnished furniture, a far easier alternative is often enough: a high-quality primer.
Primer instead of hours of sanding
A good adhesion primer ensures the topcoat bonds properly and gives the surface an even appearance. It saves sanding dust, time and frustration. The process may seem unremarkable, but it makes all the difference:
- Apply the primer generously with a roller or brush, without allowing it to drip.
- Use a smaller brush for edges and moulded details.
- Follow the drying time specified by the manufacturer exactly.
The better the primer adheres, the calmer and more even the painted surface will look later – making the furniture appear more like a workshop-made piece than a craft project.
Applying paint: thin coats rather than a heavy layer
The new finish is at the heart of the makeover. A professional tip is to apply several thin coats of water-based paint rather than one thick layer that runs.
Choosing the right shades
Light shades can transform old furniture especially dramatically. Popular choices include:
- warm off-whites
- cream shades with a subtle beige undertone
- light greige for minimalist interiors
These colours immediately reduce the visual weight of heavy cabinets and bring more light into the room. Those who prefer a bolder approach can paint individual areas, such as the plinth or the inside of the doors, in an accent colour such as sage green or deep blue.
How to paint without a DIY look
- Paint large surfaces with a fine foam roller, always following the wood grain.
- Use a narrow paintbrush for corners, profiles and carved details.
- Allow each coat to dry thoroughly; correct small runs immediately using a cloth and a little thinner or acetone.
- Leave doors slightly open while drying so that surfaces do not stick together.
Two to three thin coats are generally sufficient to cover dark wood reliably. Taking your time and avoiding “brushing back and forth” produces a calm, even finish.
Handles, finish and protection: details create a designer piece
The hardware often determines whether the finished piece looks old-fashioned or modern. Original brass or porcelain handles usually carry the unmistakable character of previous decades.
New handles, new life
An old cabinet with fresh paint and modern handles can look as though it came from a current interiors catalogue – at minimal cost.
Popular options for a contemporary finish include:
- simple matte-black bar handles
- round knobs in brushed brass
- leather pulls for a Scandinavian look
If the original handles are worth keeping, refresh them with spray paint in matte gold or black. The contrast between a light cabinet body and dark or gold handles looks particularly refined.
Sealing and care
To make the furniture suitable for everyday use, finish with a protective coating. Depending on the desired appearance, suitable options include:
- Matt varnish: a restrained, modern sheen that is durable in daily use.
- Wax: soft to the touch and easy to reapply, making it ideal for lightly used surfaces.
Once properly sealed, the new finish can last five to ten years. A slightly damp cloth and mild cleaner are all that is needed for care; harsh cleaning products can damage the finish.
Common mistakes and how to avoid them
Many projects fail not because of a lack of skill, but because of small oversights. Knowing these pitfalls can prevent a great deal of frustration:
- Insufficient cleaning: Greasy residue can cause paint to peel later.
- Coats that are too thick: The result is paint runs, visible brush marks and lengthy drying times.
- Cheap tools: Brushes that shed bristles and coarse rollers leave marks in the paint.
- Impatience: Closing doors before everything has fully cured can leave unattractive imprints.
It can help to practise first on a smaller piece, such as a bedside table. This allows you to gain experience before tackling a large inherited item.
How to control the style deliberately
The same basic steps can achieve entirely different looks. Colour, handles and the surrounding décor are what make the difference.
| Style | Colours | Handles | Suitable décor |
|---|---|---|---|
| Light Scandi | Cream, off-white, light grey | Leather, wood, understated metal | Linen, plants, pale rugs |
| Modern minimalist | Greige, mid-grey, black as an accent | Matte black, clean lines | Metal lamps, graphic artwork |
| Elegant classic | Cream shades, dark blue, deep green | Brass, matte gold | Mirrors, velvet cushions, heavy curtains |
When the effort is worthwhile – and when it is not
A makeover is particularly suitable for sturdy furniture made from solid wood or high-quality veneer. Wobbly shelving made from thin chipboard is rarely a sound starting point. Before beginning, check the following:
- Does the furniture stand level and remain stable?
- Do the drawers and doors work properly?
- Is there any moisture damage or mould?
If no major issue is found, there is a good chance of achieving a long-lasting result. Small cracks or dents can be smoothed with wood filler before painting begins.
More than appearance: what this kind of transformation can achieve
After a successful project, many people find that not only the room changes, but also the way they see their home. Furniture that once felt like a burden becomes a point of pride that guests talk about. It also encourages a more mindful approach to possessions: not everything needs to be new, and much can be improved.
Anyone who enjoys the process can use the technique on other pieces, from side tables to kitchen units. The sequence remains the same: clean thoroughly, prime well, paint patiently and upgrade the details. Step by step, an old heirloom becomes a modern one-off that can continue telling stories for many years.




Comments
No comments yet. Be the first to comment!
Leave a Comment