
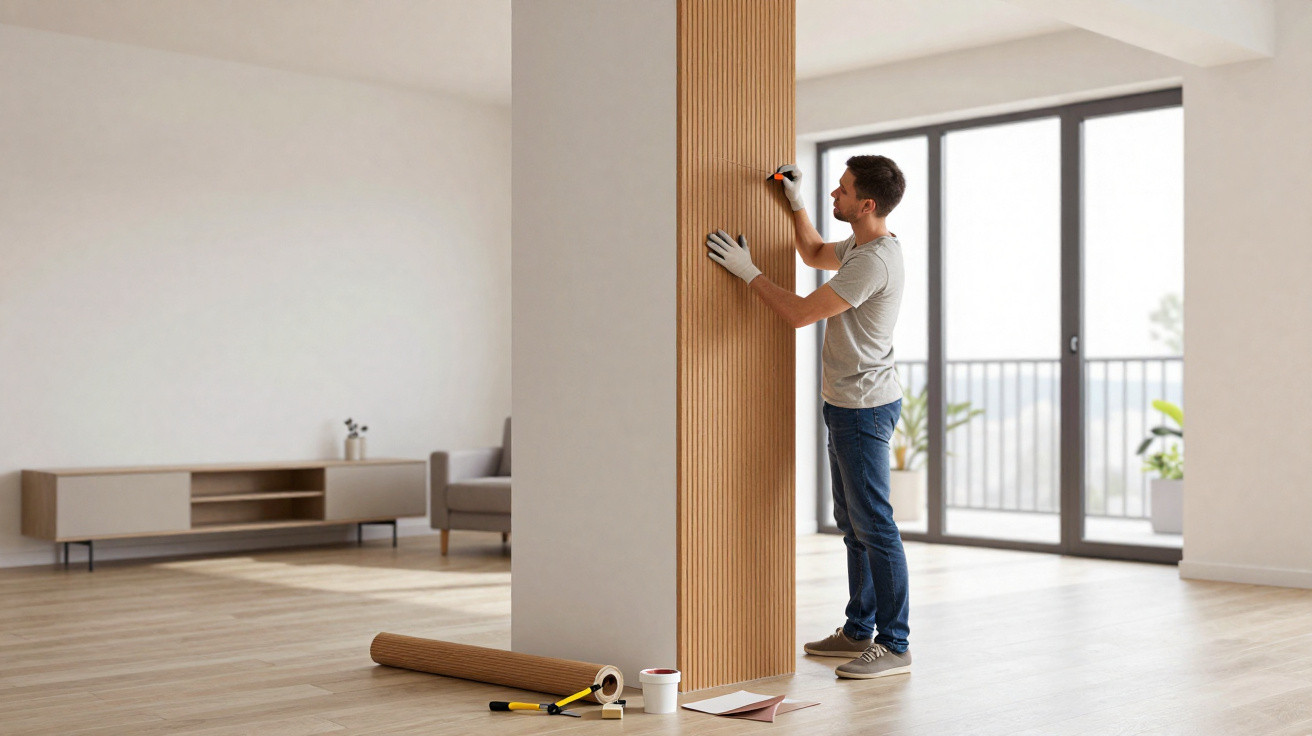
A roll of ribbed wood veneer, an unused afternoon and a little confidence can subtly transform the feel of an entire home.
Once a basement workaround, flexible wood pole wrap is now appearing in lounges, balconies and gardens. Cut, glued and wrapped in inventive ways, it can make ordinary posts, plain furniture and exposed railings appear considered rather than makeshift.
What is pole wrap, and why is it so popular?
Pole wrap is a pliable sheet of thin veneer, generally made from real wood, with pre-cut grooves that form a fluted finish. Supplied on a roll, it curves readily around rounded surfaces and can be bonded to most firm substrates. Its original purpose was to conceal structural support columns in American basements.
It has since entered mainstream interior DIY, moving from social-media reels to large home-improvement retailers. The fluted finish now features on sideboards, kitchen islands and even balcony screens. Its popularity comes from combining wood’s warmth, the gentle shadows cast by its grooves and a neater, more architectural appearance.
Pole wrap works like a second skin: it dresses the surface without touching the structure, which means no heavy renovation and fewer permits.
As it is applied only to the surface, pole wrap is generally viewed as cosmetic rather than structural work. This makes it appealing to tenants and homeowners seeking a noticeable change without reconstructing half the room.
Wrapping structural posts: the original transformation
Support posts bear significant weight, so they must never be moved, cut or notched. Builders secure them to concrete using bolts, brackets and chemical anchors, which need to remain sufficiently accessible for inspection. Pole wrap covers this practical structure much like clothing covers a skeleton.
Turning an unattractive post into a feature column
For a straightforward update, DIYers usually:
- measure the post’s circumference precisely;
- cut a section of pole wrap using a fine saw or utility knife;
- spread construction adhesive or a powerful grab adhesive over the post;
- push the wrap into position, then clamp or tape the join as it dries;
- lightly sand it before applying stain, oil or paint.
A previously industrial-looking metal column can become a warm, timber-effect feature in a lounge, complementing shelving or floorboards. In a basement, an isolated pole in the centre of the space can begin to look like part of a bar, reading area or home gym, rather than an obstruction.
Patio and deck posts: more substance, gentler lines
The approach can also alter the feel of a terrace or veranda. Clad posts appear more substantial and purposeful, bringing them closer to the architectural timber often seen in boutique hotels. Owners commonly finish these improved columns with exterior curtains, lanterns or hanging planters.
The wrap should never trap water against a load‑bearing post. Small gaps, breathable finishes and stainless fixings help the structure last longer.
For outdoor projects, use finishes rated for weather exposure and pay close attention to detailing. This includes stainless-steel screws or staples for securing the wrap, a hard-wearing exterior varnish, and routine inspections for damp or insect activity behind the cladding.
Interior DIY: 6 clever furniture upgrades with pole wrap
Furniture is where pole wrap is particularly effective. Once fluted wood is added, flat-fronted cupboards and inexpensive particleboard furniture can look far more carefully made.
1. Fluted drawer and sideboard fronts
One familiar project begins with a simple chest of drawers. Cut the wrap into rectangles matching each drawer front, bond them in place, trim the edges and fit understated handles. The fine vertical channels produce shadows reminiscent of premium joinery, particularly alongside black, brass or stainless-steel pulls.
2. Sculptural bases for coffee tables
Drum-shaped coffee tables can be expensive to buy. Using pole wrap, DIYers can clad a basic round base, or even a square plinth, before topping it with glass, stone or a timber disc. The fluting gives the base a sculptural quality while leaving the top visually simple.
3. Subtle updates for chair and stool legs
Thick chair and bar-stool legs may appear cumbersome. Applying slim strips of pole wrap around their lower sections introduces a tailored feature and makes them seem more slender. Sanding and painting the whole chair in a single colour then unifies the result.
4. Fluted headboards with a boutique feel
A headboard gives a bedroom character, while pole wrap offers an easy route to a bespoke version. Many DIYers attach wrap panels to plywood cut into a gentle arch or rectangular form, then fix it to the wall behind the bed. A clear coating highlights the grain; alternatively, paint matching the wall creates a restrained but textured background.
5. Shelf edges and bookcases with added dimension
A standard flat-pack bookcase can also gain more visual weight. Adding strips of wrap to its vertical edges creates a framing effect around the shelves. On a media unit, this same method can conceal cable openings and make the entire wall feel more deliberate.
6. Accent panels and room “micro-zones”
Small sections of pole wrap behind a desk, beside a reading chair or below a breakfast bar can define micro-zones within an open-plan space. Painting the wrapped section in a richer tone, or staining it more deeply than the surrounding wall, further establishes a distinct corner without building partitions.
Fluted veneer takes paint well, but stain or oil preserves the grain and avoids the plastic feel you sometimes get with plain MDF upgrades.
Outdoor projects: 5 pole wrap ideas for privacy and texture
A second wave of pole wrap projects is moving outdoors. In compact gardens and urban balconies, the need for screening combines with a preference for something more inviting than bare metal railings.
1. Partial fence screening
Rather than replacing a whole fence, some homeowners fix strips of pole wrap to only selected panels. Alternating smooth boards with fluted areas breaks up long stretches of timber and gives the boundary a more designed appearance. Since the wrap is grooved rather than made from solid boards, light can still travel across it throughout the day.
2. Background screens for climbing plants
Pole wrap can be placed behind the grid of a metal or timber trellis to form a textured backdrop. The fluting is attractive while plants remain immature, and once foliage develops, light catches between the leaves and grooves.
3. Framed screens for balconies
On tightly packed urban streets, balcony railings seldom provide enough privacy for a morning coffee or time spent working on a laptop. Lightweight timber frames clad on one or both faces with pole wrap can stand in front of existing railings without changing the building’s structure.
| Area | Typical goal | Pole wrap role |
|---|---|---|
| Side balcony | Block neighbours’ view | Fluted screen in a timber frame |
| Front porch | Softer street presence | Wrapped posts and partial side panels |
| Roof terrace | Zoning and wind filtering | Low wrapped partitions between seating areas |
Because these frames are technically removable, they can often comply with rental-property rules, provided they do not modify railings or obstruct escape routes. Regulations vary locally, so checking with building management first can prevent disputes.
4. Small gateways and garden arches
Cladding the inner face of a timber arch or pergola with narrow pole wrap strips can turn a basic structure into a more intentional route through the garden. Passing beneath it feels less like walking between two posts and more like entering a subtly separate garden room. With lighting or climbing roses, this threshold can change the perceived character of the whole exterior space.
5. Terrace posts with built-in uses
Wrapped deck posts can provide more than visual appeal. Some homeowners incorporate hooks for hanging chairs, narrow wall lights or compact fold-down tables into the clad surface. The wrap conceals cables and fittings while leaving the structural core undisturbed.
Think of the cladding as a service zone: somewhere to hide screws, cables and brackets so the underlying frame stays clean and legible.
Selecting the right pole wrap: material, finish and safety
Pole wrap products do not all perform in the same way. Their thickness, backing and timber species affect both their appearance and their lifespan.
- Material: Real-wood veneer offers the most characterful grain, whereas MDF-backed options are easier to sand and paint smoothly.
- Flexibility: Thin wraps curve around tight columns, while thicker profiles are better suited to flat fronts and broad curves.
- Indoor vs outdoor: Many products are intended solely for dry indoor settings; for exterior use, select moisture-resistant backings and finishes.
- Fire behaviour: Local regulations may limit the use of extra combustible cladding in stairwells or busy escape routes.
Adhesive choice matters as well. Solvent-based construction adhesives bond quickly but give off fumes, whereas water-based alternatives are kinder indoors but can require more clamping time. Proper surface preparation-removing dust and keying back glossy coatings-can determine whether the result is a short-lived trend or a long-lasting improvement.
How pole wrap reflects wider design changes
Growing interest in pole wrap fits into a broader preference for texture over bold patterns. Fluted elements are appearing on hotel reception counters, kitchen islands and bathroom vanity units as people seek calm finishes that retain personality.
The technique also mirrors a move towards reversible, low-intervention renovation. Younger homeowners and tenants are more likely to face limitations, including immovable structural walls, building rules prohibiting exterior alterations and budgets too small for complete refurbishments. Surface solutions such as pole wrap, peel-and-stick tiles and plug-in lighting respond with gradual changes rather than wholesale renovations.
For DIY newcomers, pole wrap offers a manageable level of difficulty. Most projects require basic equipment, limited working time and little mess. The strong visual result may nevertheless give people the confidence to tackle more involved joinery or carpentry in future.
There are drawbacks, too. Wood veneer is more prone to dents than solid timber, while deep fluting collects dust. In bathrooms and kitchens, steam and splashes may distort panels that have not been sealed properly. Checking the risks before every project-damp, impact, fire and landlord restrictions-helps manage these issues and ensures the material is used in spaces where it performs best.





Comments
No comments yet. Be the first to comment!
Leave a Comment