
The pan on the hob looked worn out.
Its once-black cast iron had faded into uneven grey, as though somebody had rubbed away its sheen with an eraser. There were scratches, tacky marks and that strange orange bloom of rust around the edge - enough to make you push it quietly to the back of the cupboard and reach for the non-stick pan instead. You know it could look lovely again, but you also know what “fixing it” normally involves: endless scrubbing, smoke alarms and a kitchen reeking of burnt oil.
A friend watching this drawn-out farewell to the pan made an unusual suggestion: “Why don’t you just soak it?”
Not in vinegar or soapy water, but in something hardly anyone mentions any more.
The hidden issue inside your cast iron
Take an old cast iron pan in your hands and trace the cooking surface with your fingertips. Its history is easy to feel. Small raised areas reveal where oil collected and baked on too heavily. Glossy sections mark places where the seasoning has disappeared. Coarse orange specks show where rust has started to bite into the iron. It may still cook food, technically, but eggs cling, pancakes tear and steak seems to fuse to the base as though it has signed an agreement.
Most people follow the same routine in response. They scrub more fiercely. They pour on extra oil. They “re-season” the pan by coating it in a thick layer of fat and heating it in the oven until the home smells like a fast-food fryer. The pan may become darker, certainly, but it also becomes stickier, heavier and less dependable. Its cooking surface develops into a sort of asphalt made from partly burnt oil, gradually flaking off whenever you use it.
The less obvious culprit is old polymerised oil that has gone past the point of useful seasoning and become a stubborn, patchy deposit. Beneath it, the cast iron remains solid and capable of becoming smooth, glossy and black once more. It is simply buried beneath previous mistakes. Before building a proper finish, you need a gentle way to remove the failed one - without sacrificing your weekend or abrading away half the pan. This is where the overlooked soak comes in.
The lye soak: giving a cast iron pan another chance
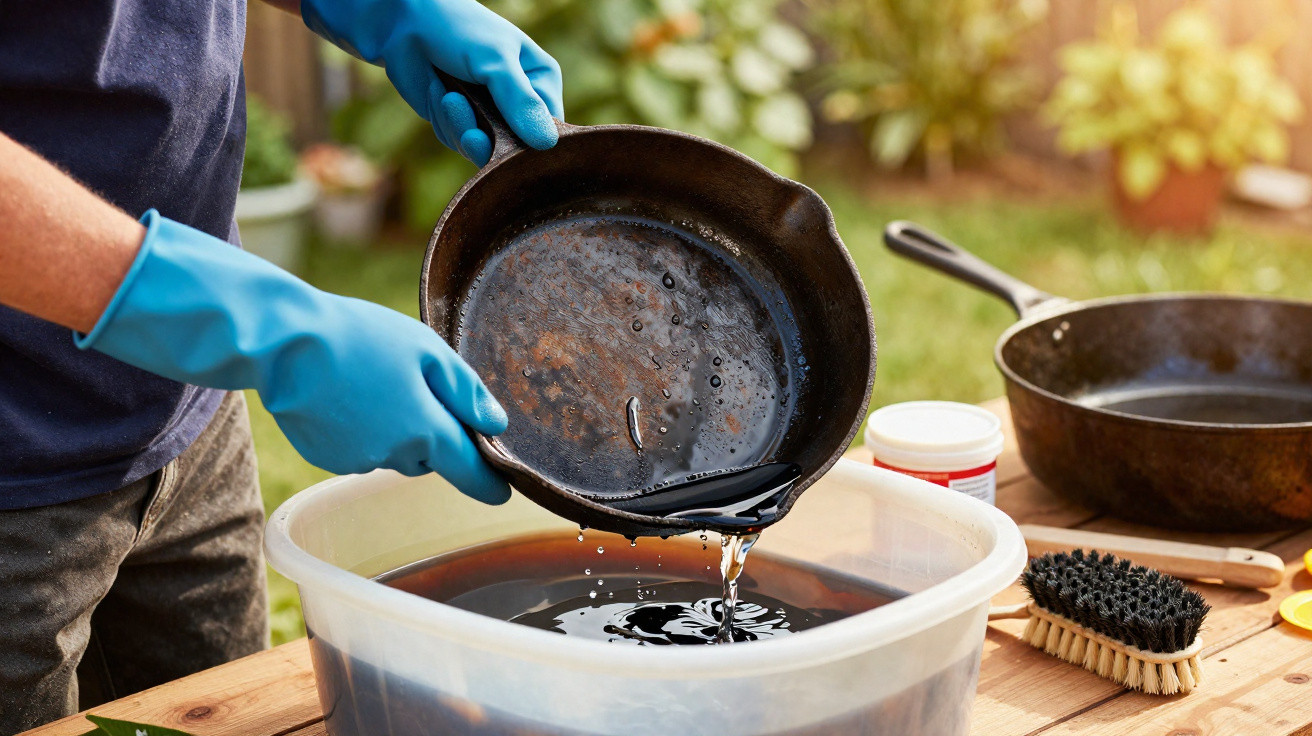
The process sounds almost implausibly easy. Find a plastic container big enough to fully immerse the pan. Add water, then introduce a particular cleaner: sodium hydroxide, more commonly called lye. This is the same alkali used in traditional soap-making and some heavy-duty oven cleaners. When combined with water at the proper strength, it works slowly but powerfully on old grease. Lower the pan into the solution, leave it alone and let chemistry take the night shift.
Over several hours - or occasionally days - the lye bath steadily breaks apart the baked-on oils gripping the pan’s surface. There is no heavy grinding, no wire wheel sending sparks towards your face and no steel wool cutting grooves into the iron. The pan comes out without its flaky, sticky “seasoning”, appearing bare and dull, yet uniformly clean. Rather than battling accumulated history, you are now dealing with fresh cast iron that can accept a new, controlled satin-black coating.
If this feels excessive, imagine a car boot sale at 6 a.m. A woman in a faded baseball cap sorts through a stack of rusty pans. She pays twenty quid for a skillet that seems to have sat on a campfire since 1953, then buys three more. At home, she does not use vinegar or sandpaper. On her patio sits a blue plastic tub containing a cloudy solution. Each pan slips beneath the surface with a quiet glug. After two days, she lifts them out wearing rubber gloves, and the change is striking. A nylon brush removes the sticky black residue, revealing logos and casting marks that had been hidden from view.
She is far from the only one. Collectors in online cast iron forums discreetly post before-and-after pictures that look almost like special effects. Gummy skillets from house-clearance sales return to a deep, smooth black not through force, but through this unhurried alkaline bath. One restorer told me he has treated “at least a hundred pans this way and never lost one to pitting,” which is remarkable once you see the depth of the old grime. The soak cannot miraculously repair rust or cracks. However, it deals with the most difficult part of the restoration: the fossilised oil that appeared to be “seasoning” but was actually burnt residue from the past.
The chemistry behind it is uncomplicated. Seasoning consists of polymerised oil: fat molecules joined together into a hard, plastic-like film. As a strong alkali, lye attacks these fats and breaks them down into soap-like substances that release from the metal. Vinegar works differently, attacking both rust and the iron itself, whereas an alkaline bath largely leaves exposed iron alone and targets the grease. That distinction matters most. The soak addresses the actual issue - degraded, inconsistent old oil. Once it has been removed, you are no longer wrestling with earlier cooking choices. You have clean metal on which to build a thin, hard and controlled seasoning that performs as it should.
How to use a lye soak safely, step by step
This technique depends entirely on patience and care. It is not a cleaner to splash on and use immediately; think of it instead as sending the pan to a quiet rehabilitation centre. Begin by collecting what you need: a robust plastic tub with a lid, cold water, pure lye - often sold as drain cleaner, but only if it is 100% sodium hydroxide with no aluminium or fragrances - heavy-duty rubber gloves and eye protection. Set up outdoors or in a well-ventilated place, as this is not a task for the kitchen worktop.
Pour water into the tub, then slowly scatter in the lye while stirring carefully with a plastic or wooden spoon. Never reverse that order. The solution will warm slightly as the lye dissolves, which is expected. When it is ready - usually a few tablespoons of lye for every gallon of water will do - lower your pan into it. Use only raw or seasoned cast iron: no aluminium and no enamelled surfaces. Once the pan is submerged in the cloudy liquid, put the lid on, keep the tub away from direct sunlight and leave it alone. Light deposits may need only 8–12 hours, while a pan carrying decades of bacon fat can require several days.
There are several ways people get this wrong, and they are worth mentioning. Some hurry, remove the pan too soon and then tackle the remaining patches with harsh tools that scar the iron. Others begin with vinegar, switch to lye and then use abrasive pads, turning the process into a muddled mixture of acids and alkalis. Some dispense with protective equipment, splash the solution and find themselves searching online for treatment for a lye burn. Let’s be honest: nobody really does that every day.
A gentler approach simply takes longer. Keep your gloves and eye protection on while taking the pan from the bath. Rinse it thoroughly with plenty of water, then brush away softened sludge beneath a running tap. If some old seasoning still remains, return the pan to the tub for another night. No drama and no grand gestures are needed. When the surface has an even dull grey or black appearance, without glossy areas of remaining residue, remove lingering alkali with a quick wipe using a mild vinegar solution, rinse again and dry it thoroughly over low heat. Only then should you begin seasoning again with thin, almost invisible applications of oil. Bake one light coat at a time until the surface becomes the understated, glassy black finish you actually want.
“The first time I pulled a pan from the lye tub, I thought I’d ruined it,” a home cook in Ohio told me. “It was this flat, ghostly gray. Then I seasoned it properly, and it was the best non-stick I’d ever owned. I realized all those years I’d been fighting bad seasoning, not bad cast iron.”
- Use only 100% sodium hydroxide, with no additives listed on the drain-cleaner label.
- Always put lye into water, never water into lye.
- Wear gloves and eye protection, and keep children and pets away.
- Do not use aluminium or enamelled items - this soak is suitable only for bare cast iron.
- Dispose of the solution in line with local regulations; do not simply pour it onto the lawn.
Why this traditional fix feels timely now
Restoring a pan in this way carries a quiet emotional weight. Instead of purchasing another gadget, you are paying attention to an old tool and allowing it another life. More than one kitchen has a skillet that belonged to a grandparent, or one picked up in a charity shop because it “felt right” in your hands. It is heavy, unwieldy and slightly marked, but somehow impossible to discard.
A lye soak is about resetting rather than achieving perfection. It suggests that starting again is allowed. The unsuitable oils, the occasions when the pan overheated and the sticky aftermath of that sauce that went wrong can all be returned to zero. They are not wiped from memory, only from the metal. Every new coat of seasoning afterwards becomes more deliberate. You select a neutral oil with a high smoke point. You apply whisper-thin layers rather than thick blobs. You heat each layer for long enough that it changes from oily to firm and dry. Slowly, the pan moves from dull grey towards a deep, assured black.
In practical terms, fried eggs slide free, pancakes turn over intact and steak develops a crust rather than sticking itself to the base. On a more personal level, there is a calm satisfaction in holding a pan that once appeared finished and sensing it return to life in your hands. On a hectic weeknight, when you simply want to serve dinner without food sticking, that feeling is not merely decorative; it is grounding. On a Sunday morning, when you bring out the restored skillet for a pile of pancakes, you recall the soak, the wait and the first fresh layer of oil. You remember that some things are not ruined at all; they are simply waiting for the right bath.
| Key point | Detail | Why it matters to the reader |
|---|---|---|
| The lye soak | A mixture of water and caustic soda that dissolves old polymerised grease | Provides a gentle, deep method for stripping the iron without damaging it |
| A genuinely clean surface | After soaking, the pan is even and matt, ready to be re-seasoned in thin layers | Makes it possible to achieve a smooth, black and genuinely non-stick finish |
| A slow, safe approach | Basic equipment, protective gear and soaking time ranging from several hours to a few days | Makes home restoration possible even for old pans that seem “beyond saving” |
FAQ:
- Isn’t lye dangerous to use on something I cook with? When handled correctly, lye acts only on old grease rather than your food. You soak the pan, rinse it thoroughly, neutralise it, rinse again and then re-season it. Nothing is left on the surface except bare iron and fresh oil.
- How long should I leave my cast iron in the lye soak? A light buildup may soften within 8–12 hours. Thick grime that has accumulated over decades can need 2–4 days. Check it daily using a gloved hand and a brush, repeating the soak until the old seasoning wipes away.
- Can I just use vinegar instead of a lye bath? Vinegar attacks rust as well as the iron itself, so leaving it too long can cause pitting. Lye targets fats and polymerised oils, removing seasoning without eating into the metal, making it safer for full restorations.
- What do I do right after the lye soak? Rinse thoroughly, scrub away the loosened material, use a brief wipe of diluted vinegar to neutralise the surface, rinse once more and dry fully with heat. Begin seasoning with very thin layers of oil while the pan is still warm.
- Will this fix deep rust or a cracked pan? The soak cannot repair structural damage. It may remove greasy deposits concealing rust, but severe pitting and cracks are permanent. The surface can still be improved, though some marks will remain part of the pan’s story.




Comments
No comments yet. Be the first to comment!
Leave a Comment