
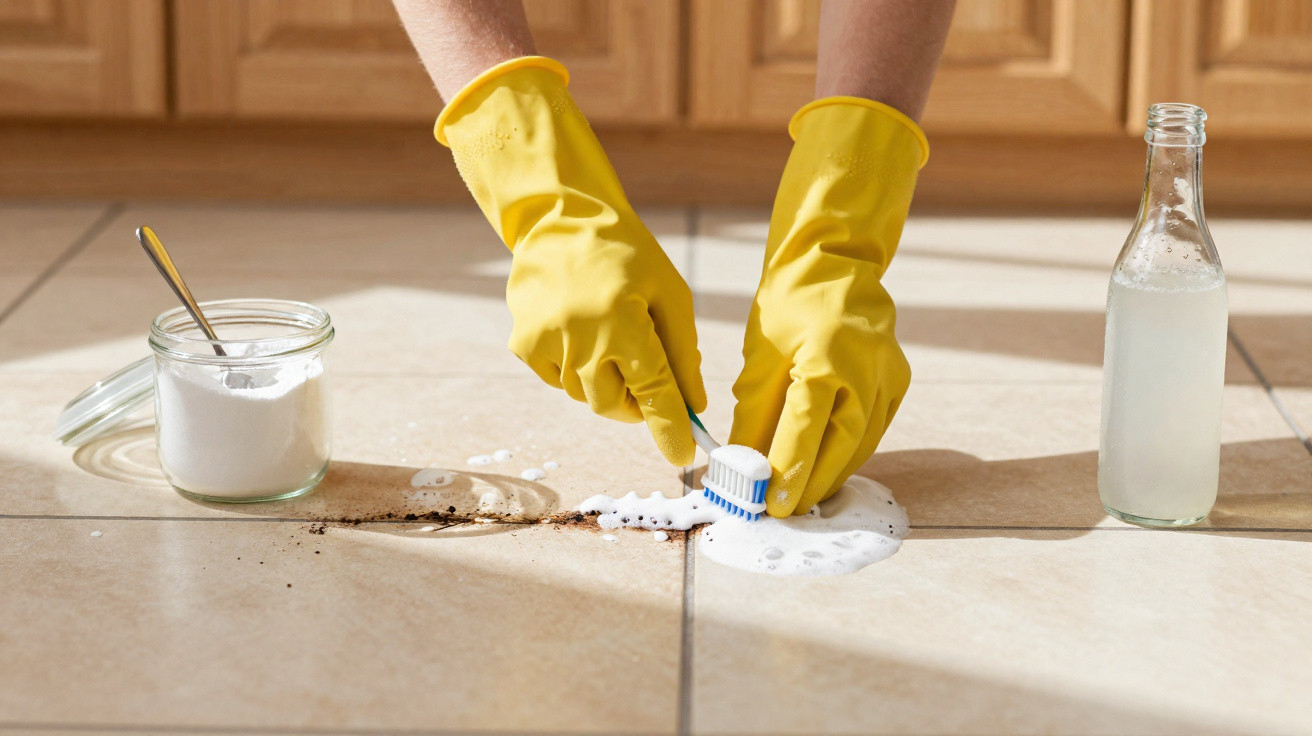
She noticed the grout lines the moment she entered the kitchen that morning. The sunlight across the cupboards did not catch her eye, nor did the fruit bowl on the worktop. All she could see were the lifeless, dark lines between the tiles, as though they had been traced with a worn-out grey pen. She had tackled them before with every “miracle” cleaner sold in a brightly coloured plastic bottle. Her wrists had not forgotten it.
This time, she decided she would not spend another penny. She went to the pantry, took out two items costing less than a latte, and within ten minutes the floor looked… new. Not flawlessly showroom-ready, but clean enough to make the entire room feel as though it could breathe again.
The odd thing is how quickly this simple trick catches on once you have watched it work.
The pantry combination that makes dirty grout give in
For many people, grimy grout suggests one of two costly solutions: hiring a professional cleaner or undertaking a complete retiling job. That is the message promoted along the home-improvement aisles. Grout pens, powerful sprays and fragranced foams all offer “like new” results, provided you are willing to pay for them and tolerate the fumes. In reality, the grime between tiles is commonly nothing more than soap scum, grease, shoe marks and the residue of everyday life lodged in tiny pores.
That is precisely why an inexpensive pantry pairing can be so effective: ordinary baking soda and white vinegar. There is no need for a fluorescent label. One is a mildly abrasive powder, while the other is an acidic liquid capable of dissolving dirt, cutting through grease and releasing stains held in rough grout. Applied in the correct sequence, they create a small, controlled science experiment on your floor.
One reader sent me photographs that looked as if they belonged in a before-and-after advertisement. She rents a home with beige tiles and grout that had become almost black along the busy hallway. There had been years of muddy shoes, a dog who didn’t care about rainy days, and a landlord who “didn’t see the problem.” She had already used up a bottle of specialist grout cleaner with almost no visible improvement.
One Sunday afternoon, she tested the pantry solution: a baking soda paste, a splash of vinegar and a brief scrub. She set a timer and spent just 12 minutes on it. In the photograph she sent afterwards, the hallway appeared suddenly brighter, despite her having changed neither the walls nor the lighting. The grout was not snow white, but it had shifted from depressing to “I can live with this” in less time than it takes to scroll through social media.
There is a straightforward reason this approach works so quickly. Grout is porous, rather like a dense sponge. It soaks up spills, mop water, detergent residue and tiny particles that can remain there for months. Baking soda provides a gentle texture that reaches into those pores without cutting or scratching the surrounding tile. Vinegar reacts with the baking soda, helping to loosen trapped dirt while also breaking down hard-water mineral deposits.
You are not “bleaching” the grout into submission. Instead, you are removing years of build-up so that its original colour can show again. Since both products are everyday household basics, you avoid filling your lungs with harsh fumes or risking unusual stains caused by an aggressive chemical mixture. It is a quiet, determined sort of clean.
How to use baking soda and vinegar on grout
The process is almost embarrassingly easy, which is one reason it feels so rewarding. Begin with a dry floor: vacuum or sweep away loose dust and crumbs. In a small bowl, combine baking soda with a little water to form a thick paste that can be spread easily, similar to toothpaste. There is no need for laboratory-level measuring.
Using an old toothbrush or a small scrubbing brush, apply the paste straight onto the grout lines. Work it in gently, one line at a time. Allow it to sit for 5–10 minutes so that the baking soda can begin releasing the grime. Then comes the enjoyable part: add a little white vinegar to a spray bottle and mist it over the paste. It will fizz like a tiny volcano, drawing dirt up from the pores. Once the brief fizzing party is over, scrub lightly and wipe the area with a damp cloth.
This is also the point at which many people become discouraged or stop too early. They may soak the floor in vinegar, miss out the waiting period or scrub as though they are polishing a car bumper. Each of these mistakes can lessen the result while making the task harder. A gentle touch is genuinely sufficient. Allow the products to work rather than relying on your shoulders.
If your grout is especially old or has never been properly cleaned, a single attempt may not deliver the result you imagined. That does not mean the technique “doesn’t work”; it simply means you are trying to remove several years of foot traffic across a few short sessions. We have all had that moment when we expect a TikTok-level transformation in ten seconds and reality is… slower. This is about steady, visible progress, not instant perfection.
Sometimes you only notice how dirty your grout was when a small cleaned patch suddenly makes the rest of the floor look tired, like one polished shoe next to a scuffed one.
- Start small: Try the method in an inconspicuous corner first to check how your tiles and grout respond, particularly if the grout is coloured.
- Use the right tool: A soft or medium toothbrush, a slim grout brush or a small scrubbing pad offers control without harming the lines.
- Work in sections: Cleaning one square metre at a time helps you track progress, remain motivated and prevent drying streaks.
- Rinse properly: After scrubbing, wipe with a clean damp cloth or mop to remove the lifted dirt rather than spreading it elsewhere.
- Don’t go overboard: For most homes, using this pairing once every few weeks is more than enough; daily use is more punishment than cleaning.
When an inexpensive trick changes the way you view your home
There is something subtly powerful about seeing a worn floor come back to life beneath your hands using products already in the house. There is no rushed trip to the shops and no lengthy receipt full of items that will be used once before disappearing beneath the sink. Just a tub of baking soda, a bottle of vinegar and ten determined minutes of your time. The room seems brighter, and you move through it differently.
A small but visible success like this can extend to other parts of the home. Readers write to say that they began with kitchen grout before moving on to the shower, entrance hall and even the terrace. It is not because they suddenly became cleaning fanatics. Let’s be honest: nobody really does this every single day. Rather, getting started feels less daunting when your “method” sits quietly in the pantry and costs less than a fast-food side.
| Key point | Detail | Value for the reader |
|---|---|---|
| Pantry-based cleaning | Using baking soda and white vinegar instead of specialty products | Lowers costs and avoids harsh chemicals in daily cleaning |
| Simple step-by-step method | Baking soda paste, short rest, vinegar spray, light scrubbing, thorough rinse | Makes grout cleaning accessible even for beginners or busy people |
| Realistic expectations | Progress over multiple short sessions, not instant perfection | Reduces frustration and increases chances of actually finishing the job |
FAQ:
- Question 1 Can I use this baking soda and vinegar method on colored grout?
- Answer 1 Yes, in most cases, but always test a hidden area first. On some darker or dyed grouts, strong, repeated use of acidic products like vinegar can slightly fade the color over time. If your test patch looks fine after drying, you’re good to go.
- Question 2 Is vinegar safe for all types of tile?
- Answer 2 No. Avoid vinegar on natural stone such as marble, travertine, limestone or some slates, because the acid can etch the surface. For those, use baking soda with warm water and a stone-safe cleaner instead, skipping the vinegar step altogether.
- Question 3 How often should I clean my grout this way?
- Answer 3 For busy areas like kitchens and entryways, once a month or even every two months is usually enough. In low-traffic rooms, a deep clean two or three times a year can keep grout looking fresh, with quick wipe-downs in between.
- Question 4 What if my grout still looks stained after cleaning?
- Answer 4 Deep, old stains sometimes go beyond the surface. Try a second or third round on those spots, using a slightly stiffer brush. If the color doesn’t budge, the grout itself may be permanently discolored and might need refreshing with a grout pen or partial regrouting.
- Question 5 Do I need to seal the grout after cleaning?
- Answer 5 You don’t have to, but sealing clean grout can slow down future staining. A simple water-based grout sealer, applied once the lines are completely dry, acts like a protective coat and makes the next round of cleaning much easier.



Comments
No comments yet. Be the first to comment!
Leave a Comment