
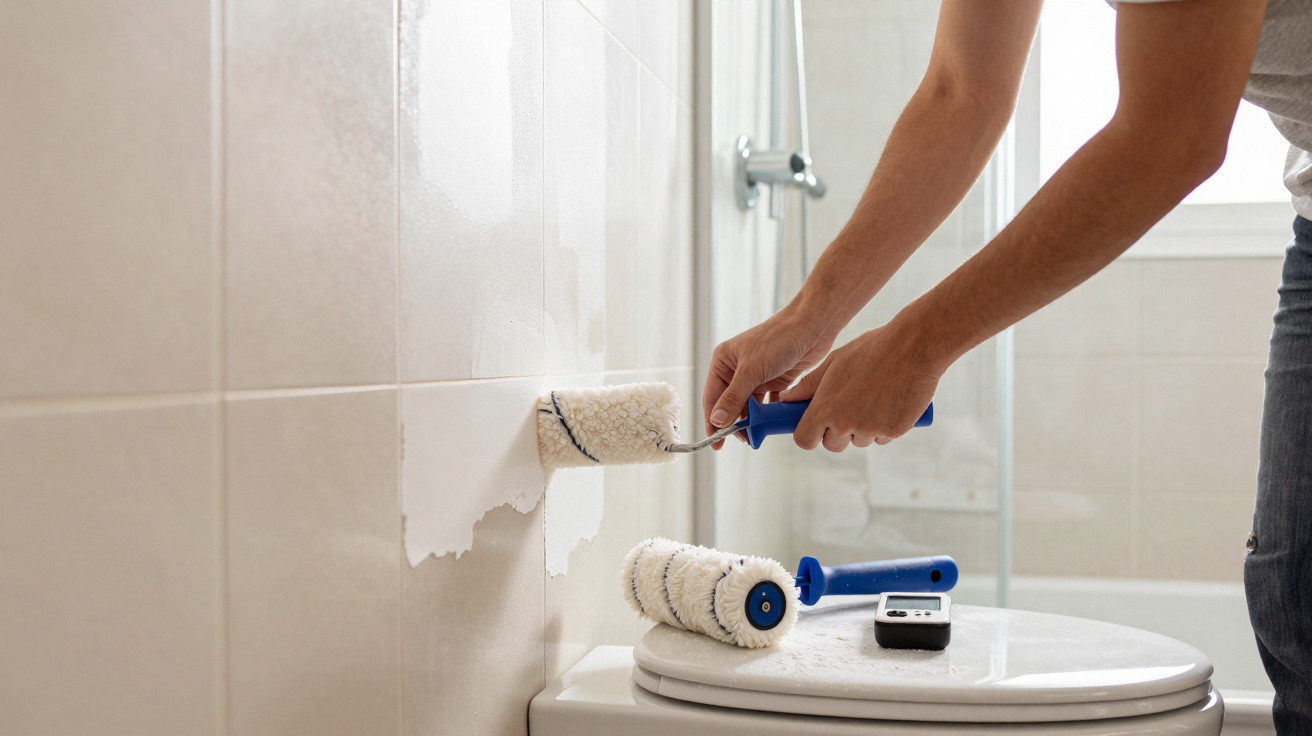
Many DIY enthusiasts know the situation: you are standing in a DIY store, spot a special offer, pick up a “universal” wall paint – and feel like a professional once the painting is done. Only months later does it become clear whether that choice was actually a sensible one. In bathrooms especially, the wrong coating often takes its revenge in the form of unsightly bubbles, cracks and peeling patches.
The supposedly perfect paint job that turned into the opposite
Everything looked flawless at first
Straight after painting, the result can look impressive. The walls appear even, the colour is spot on, and the light feels more welcoming. Anyone stepping into their “new” wet room after finishing the job will initially feel proud. For the first few weeks, the paint holds up confidently; even with daily showers, nothing seems to change.
That is precisely where the trap lies: many standard interior paints are designed for dry rooms – living rooms, bedrooms and hallways. They can withstand brief moisture, but not the persistent, dense cloud of water vapour created by hot showers. What initially looks like a clever way to save money turns out to be a ticking time bomb.
An unsuitable bathroom coating often works only like an attractive backdrop – until the moisture looks behind the curtain.
The damage appears after 6 to 18 months
Most problems do not emerge after two weeks, but gradually. On average, it takes between half a year and a year and a half before the damage becomes properly visible. Suddenly, bulges appear, the surface looks swollen, and in some areas the coating actually bursts open.
Typical problem areas include:
- the ceiling directly above the shower or bath
- the wall hit head-on by the steam
- corners and edges where air circulates less effectively
In these areas, humidity often rises well above 80 per cent after showering. Standard wall paints cannot cope with this kind of climate. Moisture works its way behind the paint layer, its bond to the substrate fails, and bubbles form before flakes eventually fall to the floor.
What is actually happening? The physics behind paint bubbles
Water vapour as an invisible attacker
Every hot shower produces a substantial amount of water vapour. It spreads through the room, condenses on cooler surfaces and, if the paint is not designed for it, gradually penetrates behind the coating.
The paint layer essentially acts like a film. When moisture gets behind it, that film swells from within. At first, this looks like small raised areas; later, the paint comes away in large sheets. This is not the result of a “bad painter”, but of using the wrong product for this environment.
Where water vapour keeps knocking day after day, a wall needs more than attractive paint – it needs a protective shield.
Why standards and technical ratings genuinely matter in bathrooms
Clear standards exist for damp rooms. Anyone wanting to choose the right tin in a DIY store should check the technical details. Suitable options for bathrooms include:
- solvent-based paints, often described as “glycol or synthetic resin paint”, for damp rooms
- high-quality acrylic paints explicitly labelled “for bathroom / kitchen / damp rooms”
- products with tested moisture resistance under recognised European standards
These paints contain durable binders and additives that prevent water vapour from travelling behind the surface. Ignoring such information means saving money in the wrong place – and the cost becomes obvious when everything has to be redone.
Recovery plan: how to paint a bathroom so it stays protected
Step 1: Remove old damage thoroughly
Before a new coat is applied, the substrate must be sound. Otherwise, the damage is merely being covered up.
- Scrape away all loose paint until a stable surface is exposed.
- Cut open bubbles, allow the substrate to dry and remove any crumbly material.
- Depending on the material, fill, sand and thoroughly vacuum up dust.
- Let damp patches dry first; use a dehumidifier if necessary.
Only a firm, clean and dry base can support a new, durable coating.
Step 2: Use an adhesion primer against moisture
A specialist primer is useful before the actual painting begins. These products penetrate the substrate and seal its pores, making it harder for moisture to get in. At the same time, the primer helps the later top coat adhere evenly.
This intermediate step is particularly worthwhile on plasterboard, old filled areas or porous plaster. Skipping it risks preventing even an expensive damp-room paint from delivering its full potential.
Step 3: Proper ventilation is not a “nice-to-have”
Even the best paint will lose the battle if humidity remains too high for too long. Controlled ventilation therefore plays an important part in modern bathrooms. An extractor fan or central ventilation system should remove sufficient air for moisture levels to fall promptly after showering.
| Measure | Effect on humidity |
|---|---|
| Open the window wide for 10–15 minutes after showering | faster removal of water vapour |
| Electric extractor fan with adequate capacity | continuous dehumidification, even without a window |
| Leave the door slightly open while showering, where possible | spreads steam across a larger volume of space |
| Turn the heating up slightly | allows surfaces to dry faster |
As a guideline, keeping room air consistently below around 65 per cent relative humidity drastically reduces the risk of bubble formation and mould.
Step 4: Apply two coats with patience
Many amateur painters are too impatient. They apply the second coat even though the first layer has not fully dried through. Damp-room paints in particular need time for their film to become stable.
Two opaque coats are recommended, each rolled in a slightly different direction to avoid streaks. Leave at least one full day between coats. During this period, avoid taking hot showers and allow the walls to cure undisturbed.
What DIY enthusiasts can learn from this bathroom disaster
Without moisture management, even the best paint achieves little
A sealed paint layer is only one part of the system. Anyone seeking to protect their renovation over the long term must address the cause: too much water vapour in the room. Regular airing, a working extractor fan and not continuously running tumble dryers in the bathroom all considerably extend the life of the coating.
In practical terms, humid air should be removed quickly after every shower. Consistently allowing the bathroom to dry out after use not only reduces paint damage, but also lowers the risk of mould behind furniture or in joints.
The right combination makes the difference
Anyone who takes three points seriously has a good chance of keeping walls visually stable for several years:
- a carefully prepared, dry substrate
- primer and specialist damp-room paint instead of a universal product
- controlled ventilation and sensible everyday use
In practice, this combination often lasts three to five years before minor touch-ups become necessary. Compared with a cheap paint job that starts showing its first defects after just a few months, that is a far less stressful period.
Anyone unsure whether their own bathroom is at risk can use a simple hygrometer. This small measuring device displays humidity. If its reading regularly remains well above 70 per cent for a long time after showering, it is worth reviewing ventilation, the paint coating and potentially hidden damp areas behind cupboards or curtains.
This prevents “if only I had used the right paint” from becoming a personal bathroom drama, and instead makes it a renovation measure that pays off over the long term – both visually and financially.

Comments
No comments yet. Be the first to comment!
Leave a Comment